


3–6 Weeks, 2–4 Months: Contractor Verified Bathroom Gut Timeline
Request Your Free Estimate Today
GET A FREE ESTIMATE →A full bathroom gut renovation strips the room to the studs and rebuilds it in phases: planning, demolition, first fix plumbing and electrical, waterproofing and tile, second fix fixtures, and finishing. Active construction typically runs 3 to 6 weeks, while the full process, including planning and material lead times, usually spans 2 to 4 months. Expect the bathroom to be unusable from the day demolition starts until the final inspection is signed off.
TL;DR:
- Delays often occur due to long lead times for custom materials like countertops and glass, which must be ordered before demolition begins.
- Inspection and cure times for waterproofing and grout are non-negotiable and can extend the schedule by several days to weeks.
- Hidden problems such as rot, mould, or outdated plumbing discovered during demolition can add days of unplanned work.
- Proper pre-demo planning, including verifying material deliveries and filing permits early, significantly reduces overall project delays.
- Owners should lock decision deadlines for fixtures and finishes beforehand and document all work steps to minimize schedule slips.
Table of Contents
- What happens during a full bathroom gut renovation, week by week
- Planning and prep: what needs to happen before demolition starts
- What happens during demolition and site preparation
- What happens during rough-in plumbing and electrical
- Substrate, waterproofing, and tile: why this phase eats the calendar
- Second fix: fixtures, countertops, and glass installation
- Finishing touches, the snag list, and final inspection
- Why bathroom renovation timelines slip and how to budget for it
- The contractor-verified checklist that keeps a gut renovation on track
- The gap between a clean schedule and how gut renovations actually go
- Ready to plan your bathroom gut renovation?
- Sources
What happens during a full bathroom gut renovation, week by week
Every contractor estimate should map to something close to this baseline. If a quote skips straight from demolition to finished photos with no mention of inspections or cure time, that is worth questioning before you sign anything.
The stages of a bathroom gut renovation follow a fixed order because plumbing, framing, and tile all depend on the step before them being inspected or cured. You cannot tile over a membrane that has not set, and you cannot close a wall a municipal inspector has not seen yet.
| Week | Work performed | Bathroom usable? |
|---|---|---|
| Week 1 | Demolition, fixture removal, debris haul-away | No |
| Week 2 | Rough-in plumbing and electrical, framing adjustments, inspections | No |
| Weeks 3–4 | Substrate installation, waterproofing membrane, tile on shower floor then walls, then main floor | No |
| Weeks 4–6 | Vanity and countertop templating and install, glass fabrication and install, finish plumbing trim | Usually no, until final inspection |
| Week 6+ | Snag list corrections, deep clean, final building and plumbing inspection | Yes, once signed off |
A few things stretch this schedule almost every time:
- Grout and thinset need real cure time before they can handle water or foot traffic, not just a visual “looks dry” check.
- Waterproofing membranes have manufacturer-specified cure windows that contractors should not skip to hit a deadline.
- Countertop and glass fabrication run on their own clocks once templated, often adding one to three weeks that overlap with other finishing work.
- Municipal inspectors work on their own scheduling calendars, and a missed appointment can push the whole downstream sequence back several days.
The point of a week-by-week table is not to give you a guarantee. It is to give you a baseline so you can ask your contractor pointed questions when their schedule diverges from it. If they cannot explain why week 3 stretched into week 5, that is a conversation worth having before it stretches further.
Planning and prep: what needs to happen before demolition starts
The single biggest driver of a smooth full bathroom renovation process is what gets decided and ordered before anyone picks up a sledgehammer. Confirming delivery dates on major materials before demolition is the most effective way to avoid the kind of long, expensive delays that turn a six-week job into a ten-week job.
Start with layout. If the new design keeps the toilet, tub, and vanity in their existing positions, you avoid moving drain lines, which saves both time and money. Relocating a drain means cutting into the subfloor or ceiling below, adjusting venting, and often triggering a more involved plumbing inspection. That decision alone can add several days to the rough-in phase.
Custom items need to be ordered well ahead of demo day, not scheduled around it:
- Vanities and custom cabinetry, particularly anything built to non-standard dimensions
- Countertops in natural stone or engineered quartz, which are fabricated after templating
- Shower glass, which is almost always measured after tile is installed and then fabricated to order
- Specialty tile, especially large-format porcelain or imported materials that ship on longer schedules
Permits should be filed as soon as the scope is locked in, since plumbing and electrical permits typically need to be in hand before rough-in inspections can be booked. Waiting until demolition is underway to start that paperwork is one of the most common self-inflicted delays homeowners cause.
If your home has only one bathroom, this is also the moment to line up an alternate plan. A hotel stay, a portable toilet rental, or an arrangement with a nearby family member sounds excessive until you are three weeks into a project with no working shower.
Pro Tip: Ask your contractor to confirm in writing that vanities, countertops, and glass have been ordered before demolition begins, not after. A “we’ll get to it” answer on materials is the clearest early warning sign of a schedule that is going to slip.
What happens during demolition and site preparation
Demolition itself moves fast, often wrapping in one to two days for a standard bathroom. Crews shut off water and power to the space, strip out the tub, toilet, vanity, and tile down to bare studs and subfloor, then haul debris off site.
A competent crew works through a checklist before the first swing of a hammer:
- Water and gas shut-offs confirmed and labelled
- Fixtures, mirrors, and cabinetry removed intact where reuse or donation is possible
- Tile, drywall, and flooring stripped to studs and subfloor
- Plastic sheeting and floor protection installed through hallways and adjacent rooms
- Dust containment barriers set up, particularly important if the bathroom shares a wall with a bedroom
- Debris bagged or bin-loaded for disposal, with disposal method confirmed in advance
Demolition is also when hidden problems surface, and this is the moment that most often turns a tidy schedule into a longer one. Rotted subfloor, mould behind tile, and old cast-iron drain pipes are the three most common discoveries. Cast-iron stacks in older homes sometimes need full replacement rather than a simple tie-in, which adds both plumbing labour and inspection time. Mould found behind a tub surround can require remediation before framing even begins.
None of this means your project is in trouble. It means gutting a bathroom is worthwhile precisely because it exposes problems a surface renovation would have papered over, including issues like insufficient insulation or sealed-in moisture that would otherwise keep causing damage behind the walls.
What happens during rough-in plumbing and electrical
Rough-in, sometimes called first fix, is the behind-the-wall work that has to be complete and inspected before drywall goes back up. This is arguably the most consequential phase in the entire full gut remodel checklist, because mistakes here are expensive to fix once walls close.
Plumbers relocate or extend supply lines and drain, waste, and vent piping according to the new layout. Electricians run new circuits for exhaust fans, vanity lighting, GFCI outlets, and any heated flooring system. For a standard bathroom with no major layout changes, this typically runs two to three working days. Moving a toilet drain or adding a second sink can push that closer to a full week.
Before anything gets closed in, a careful contractor performs and documents a few checks:
- Pressure testing new supply lines to catch leaks before they are buried in a wall
- Photographing rough plumbing and wiring runs for future reference
- Confirming blocking is in place for grab bars, vanity mounts, and any wall-hung fixtures
- Verifying exhaust fan ducting runs to an exterior vent, not just into the attic
Municipal inspections happen at this stage, and pre-booking the inspection slot rather than scrambling for one after the work is done is what separates a smooth schedule from a stalled one. A failed inspection over something minor, like an unsecured junction box, means a reinspection appointment that could be days away depending on your municipality’s booking calendar.
Pro Tip: Ask to see the pressure test results before drywall goes up. A contractor who documents this as a matter of course is one who is thinking about avoiding disputes later, not just moving fast now.
Substrate, waterproofing, and tile: why this phase eats the calendar
This is the stretch of the timeline that tests patience more than any other, and it is where an inexperienced crew tends to cut corners that surface as leaks two years later.
Wet zones, meaning the shower and tub surround, need cement board or a purpose-built wet-area substrate, never standard drywall. Dry walls elsewhere in the room can use moisture-resistant drywall, which is faster and cheaper to install where it will not see direct water exposure.
Waterproofing comes next, either as a liquid membrane rolled or troweled on, or as a sheet membrane bonded with thinset. Sheet membranes tend to be more forgiving for a DIY-adjacent crew, while liquid membranes allow more flexibility around irregular shapes and corners. Either way, seams and penetrations, meaning anywhere a pipe or drain passes through, get reinforced with fabric tape or a purpose-made preformed corner.
Tile installation follows a strict sequence and it is not arbitrary: shower floor first, shower walls second, then the main bathroom floor last. Installing out of order risks damaging finished tile with foot traffic from trades still working overhead.
- Shower floor tile sets and cures before walls go up around it
- Shower wall tile follows, with grout curing before the enclosure sees water
- Main floor tile is typically the last surface installed, protecting it from ongoing construction traffic
Cure times between these steps are not negotiable if you want the work to last. Membrane and grout curing windows are the single biggest reason this phase alone can run a week to ten days on a bathroom that seemed simple on paper. If a contractor’s schedule shows tile and grout finishing in the same 48 hours, ask how.
Second fix: fixtures, countertops, and glass installation
Once tile is down and cured, the trades come back for what is often called second fix, the visible finish work that turns a construction site back into a bathroom.
Vanity installation comes first in this sequence, because countertop templating cannot happen until the cabinet is physically in place and level, as illustrated in the Project Portfolio | Calder Roofing & Renovations Newmarket. From there, countertop fabrication typically takes ten to fourteen days for stone or engineered quartz, since the slab is cut to the exact dimensions measured on site rather than pre-made to a standard size.
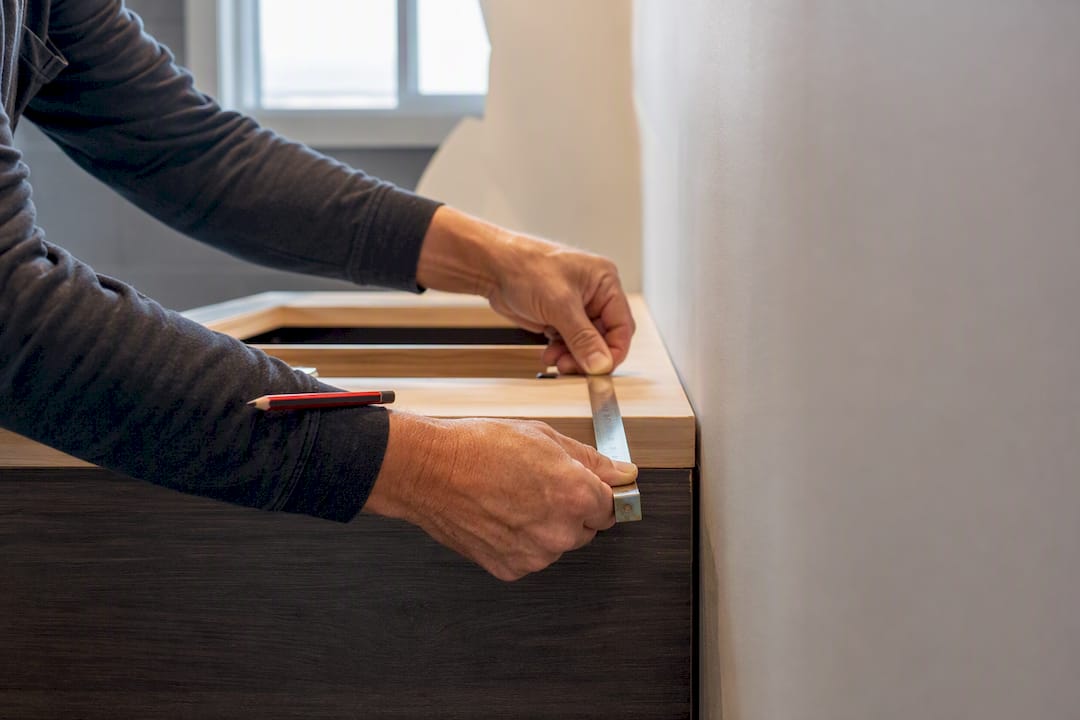
Shower glass follows a nearly identical logic. Installers measure the finished tile opening, not the framed rough opening, because tile thickness and alignment vary slightly from the original plan. Frameless glass panels then take another two to three weeks to fabricate and deliver.
While those fabrication clocks run in the background, other trades finish their remaining work:
- Plumbers install the faucet, showerhead, and finish trim on supply lines
- Electricians hang light fixtures, install the exhaust fan cover, and test GFCI outlets
- Flooring transitions and baseboards go in around the finished tile
- The toilet is almost always installed last, since it is the fixture least likely to be damaged by remaining trade traffic and easiest to protect in the meantime
This overlapping schedule, where fabrication happens off site while finish trades work on site, is what makes weeks 4 through 6 look slower on paper than they actually are. The bathroom is not idle. It is waiting on a countertop fabricator’s queue.
Finishing touches, the snag list, and final inspection
A bathroom that looks finished in photos is not the same as a bathroom that has passed final inspection, and this gap catches homeowners off guard more often than any other part of the process.
- Snag list walkthrough. The contractor and homeowner walk the space together, flagging anything that needs correcting: uneven grout lines, a scuffed wall, a cabinet door that does not close flush, or caulking that pulled away from a corner.
- Corrections. Minor items get fixed on the spot; anything requiring a trade to return, like a plumber adjusting a slow drain, gets scheduled within days rather than weeks.
- Final caulking and hardware. Silicone gets applied at all wet joints once tile and fixtures are confirmed in final position, and cabinet hardware, towel bars, and mirrors go up last.
- Deep clean. Construction dust settles everywhere, including inside vents and behind fixtures, so a proper clean matters before anyone calls the room finished.
- Final building and plumbing inspection. A municipal inspector confirms the completed work matches the approved permit and meets code, which is the step that legally and practically returns the room to use.
That last step is the one homeowners tend to overlook when estimating their own timeline. A bathroom can look camera-ready a full week before the final inspection is actually booked and passed.
Why bathroom renovation timelines slip and how to budget for it
Even a well-run project should carry a buffer, because certain risks are baked into the nature of gutting a room down to the studs.
Hidden damage is the most common cause of real delay. Discovering rotted subflooring or an outdated cast-iron drain stack mid-demolition can add several days of unplanned labour before the original schedule can resume. Custom-item lead times are the second most common culprit: a countertop or glass order placed a week late at the start of the project stays a week late all the way through, since fabrication windows do not compress just because everyone wishes they would.
Typical cost for a standard gut renovation runs $6,000 to $16,000 for a standard 5x8 foot bathroom, with high-end finishes pushing $25,000 or more. A sensible contingency sits at 10 to 20 percent of that budget set aside for exactly the kind of discoveries demolition tends to reveal, plus a time buffer of one to two weeks beyond whatever timeline your contractor first proposes.
A few habits reduce both kinds of risk:
- Confirm delivery dates on vanities, countertops, and glass in writing before demolition starts, not after
- Set decision deadlines for yourself on tile, fixtures, and paint colours so choices are locked before the trades that need them arrive
- Ask how inspections are scheduled and whether your contractor pre-books them rather than waiting until the work is ready
- Structure payments around milestones, such as rough-in completion or tile completion, rather than a flat deposit and balance
Pro Tip: If your contractor discovers rot or mould during demolition, ask for photos and a written scope change before work continues. It protects both of you and keeps the conversation about cost and timeline grounded in evidence rather than guesswork after the fact.
The contractor-verified checklist that keeps a gut renovation on track
Homeowners who avoid the worst delays tend to share one habit: they treat the pre-demo checklist as non-negotiable, not as a formality to skim past.
Before a single wall comes down, a properly run project confirms:
- All custom materials, vanity, countertop, tile, and glass, are ordered with confirmed delivery windows
- Plumbing and electrical permits are filed and approved
- An alternate bathroom arrangement is in place if this is the home’s only bathroom
- Dust containment and floor protection are set up through connecting hallways
- A written scope of work outlines what happens if hidden damage is discovered
On site, quality control matters just as much as the initial plan. Pressure-test logs on new plumbing, dated photographs of waterproofing membrane before tile covers it, and timestamped countertop templating records are the kind of documentation that reduces disputes and prevents rework later in the project.
LA Rocks Renovations builds its own pre-demo bathroom checklist around exactly these checkpoints, and pairs it with a fuller bathroom renovation checklist covering material selection, inspection milestones, and finishing standards. For anyone weighing a wet-area waterproofing decision specifically, the breakdown on waterproofing choices for wet zones is worth reading before tile goes anywhere near a shower.
The gap between a clean schedule and how gut renovations actually go
Every schedule looks tidy on paper. Reality tends to introduce two kinds of surprises, and knowing which one you are dealing with matters, because they call for different responses.
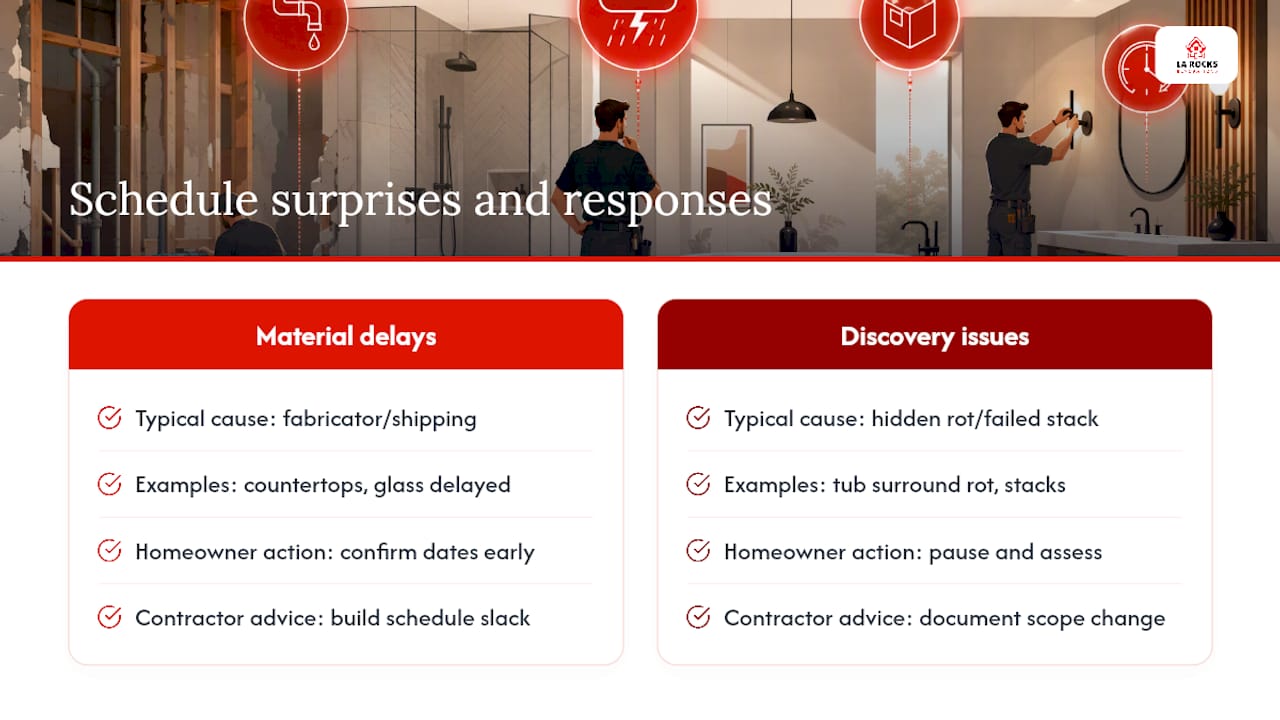
The first kind is a material problem: a countertop fabricator running behind, a glass shipment delayed a week. There is nothing to do here except confirm dates early and build in slack, since no amount of on-site hustle speeds up a fabrication queue you do not control.
The second kind is a discovery problem: rot behind a tub surround, a cast-iron stack that needs replacing instead of tying in. This is where homeowner reaction matters more than people expect. Panicking or demanding the crew “just patch it and move on” almost always costs more later than pausing for a day to assess properly and document the scope change in writing.
What I have seen separate a smooth full bathroom gut renovation from a frustrating one is not luck. It is homeowners who make their tile, fixture, and colour decisions before the trades that need those answers show up, and who treat inspection scheduling as something to plan around rather than something to react to. The projects that slip are almost always the ones where a decision got kicked down the road “to think about it,” and that delay landed on a trade standing idle with nothing to install.
If there is one habit worth adopting above all the others, it is this: ask your contractor at the start exactly which decisions need to be locked in by which week, and hold yourself to that calendar as firmly as you would want them to hold to theirs.
— Dylan Larocque
Ready to plan your bathroom gut renovation?
A renovation contractor can manage the full sequence covered here, from initial layout decisions and permit filing through demolition, rough-in, waterproofing, tile, and final inspection, so homeowners get one point of contact instead of juggling separate trades and schedules.
Before requesting a quote, it helps to have a few things ready: rough dimensions of your existing bathroom, any inspiration photos for tile or fixtures, and a sense of your household’s access constraints if this is your only bathroom. If your renovation plans extend beyond the bathroom itself, whether that means new waterproof vinyl plank flooring elsewhere in the home or a basement renovation running alongside it, the same project management approach applies.
Visit the bathroom renovation services page to see the full scope of what LA Rocks Renovations handles, and request an on-site quote to get a schedule built around your specific layout rather than a generic estimate.
Sources
- Bathroom Remodel Timeline 2026: Week-by-Week Guide
- Bathroom Remodeling Process: What to Expect from Demo to Final Walkthrough | Timber Design + Build
- What Is The Right Order of A Bathroom Renovation? (2026)