


Basement Subfloor Options: Best Choices for Canadian Homeowners
Request Your Free Estimate Today
GET A FREE ESTIMATE →For most finished Canadian basements, an interlocking insulated panel system or a floating foam-plus-plywood build is the right subfloor approach. Both create a moisture break between the concrete slab and your finished floor, add meaningful warmth underfoot, and can be installed by a capable DIYer in a weekend. If your slab is very uneven, you plan to tile, or your basement has a history of water entry, the answer shifts toward a sleeper system, an uncoupling membrane, or professional remediation before any subfloor goes down.
Before you buy a single panel, test your slab for moisture. Concrete wicks water year-round, and industry guidance suggests basements commonly have some form of moisture problem. Installing a subfloor over an active leak or high vapour emission traps moisture, feeds mould, and destroys the finished floor above it. Address water first. Build second.
Key takeaways
Choosing the right subfloor for a basement in Canada requires moisture testing first, system selection matched to your finished floor, and professional help whenever tile, uneven slabs, or active water are in the picture.
| Point | Details |
|---|---|
| Test before you build | Always moisture-test the slab with a plastic-sheet or in-situ RH test before choosing any system. |
| Match system to finish | Tile needs a rigid substrate (sleepers, plywood float, or uncoupling membrane); LVP and laminate work over most panel systems. |
| Panels suit most DIYers | Interlocking insulated panels add 3/4 in. of height, create an air gap, and carry 25-year limited warranties on leading products. |
| Hire for complex installs | Active water, wavy slabs, or tile installations are scenarios where professional installation prevents costly failures. |
| LA Rocks Renovations | Serves Durham Region homeowners with moisture assessment, subfloor installation, and finish flooring in a single coordinated scope. |
Table of Contents
- What types of subfloor work in a basement?
- Do you actually need a subfloor in your basement?
- How do you choose the right basement subfloor system?
- How to test, prep, and install a basement subfloor
- What does a basement subfloor cost in Canada?
- Which finished floors work over each subfloor type?
- When should you hire a contractor for basement subfloor work?
- Basement subfloor permits and building codes in Canada
- What experienced basement renovators know that most guides skip
- LA Rocks Renovations handles basement subfloors across Durham Region
- Sources
What types of subfloor work in a basement?
Choosing the right subfloor for a basement starts with understanding what each system actually does, not just what it costs at the hardware store.
Prefabricated interlocking panels
These are the most popular choice for Canadian DIYers. A panel like DRICORE Subfloor bonds an OSB top layer to a dimpled plastic base that lifts the wood off the concrete and creates a ventilated air gap. That gap is the key: it lets vapour dissipate rather than condense under your floor. Panels click together with a tongue-and-groove system, require no adhesive, and carry a long-term limited warranty. They add a small fraction of an inch in height and suit LVP, laminate, engineered hardwood, and carpet. They are not recommended as standalone substrates for glued ceramic tile.
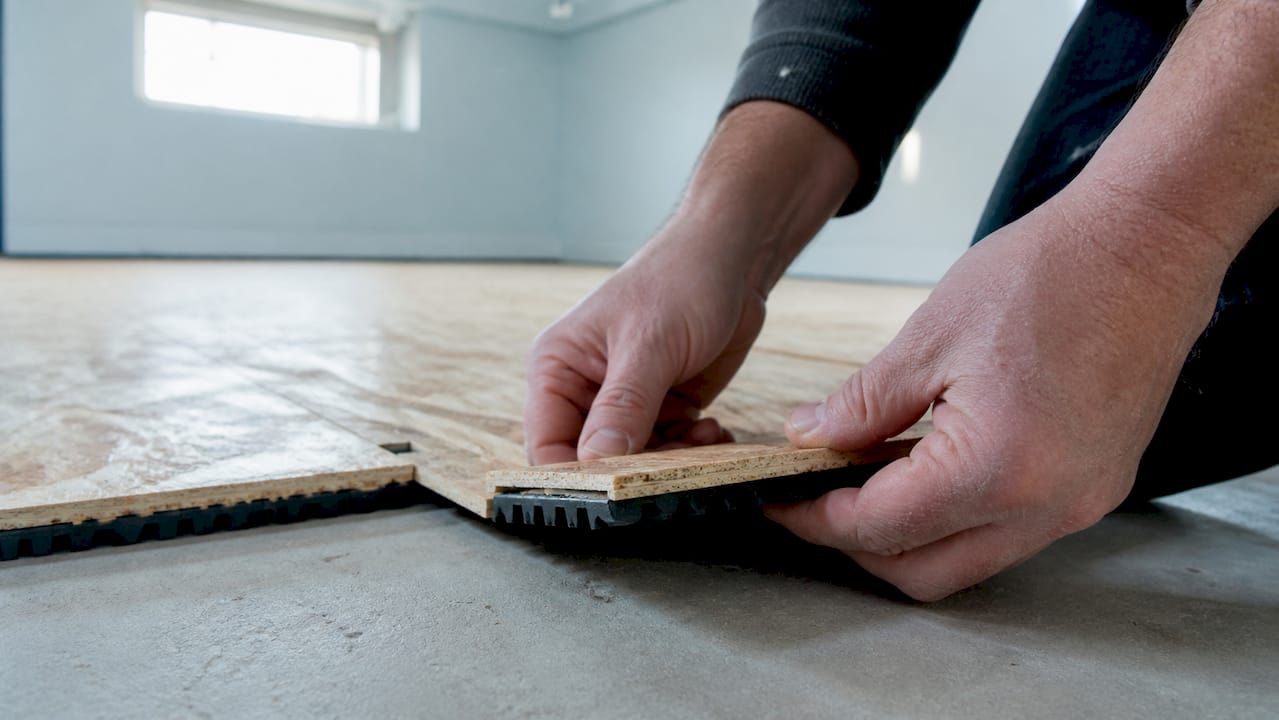
Comparative reviews of prefabricated systems show that brands such as DRICORE, Barricade, and Tyroc deliver similar moisture protection and DIY-friendly installation, but differ in their materials, R-values, and environmental credentials. The differences matter most when you are comparing insulation performance or have specific eco-certification requirements.
Foam-only panels
Rigid extruded polystyrene (XPS) or expanded polystyrene (EPS) laid directly on the slab adds insulation and a modest vapour barrier, but provides no structural surface on its own. Foam-only builds are typically combined with a plywood layer above (see below). On their own, they are too compressible for most finished floors.
Foam plus floating plywood
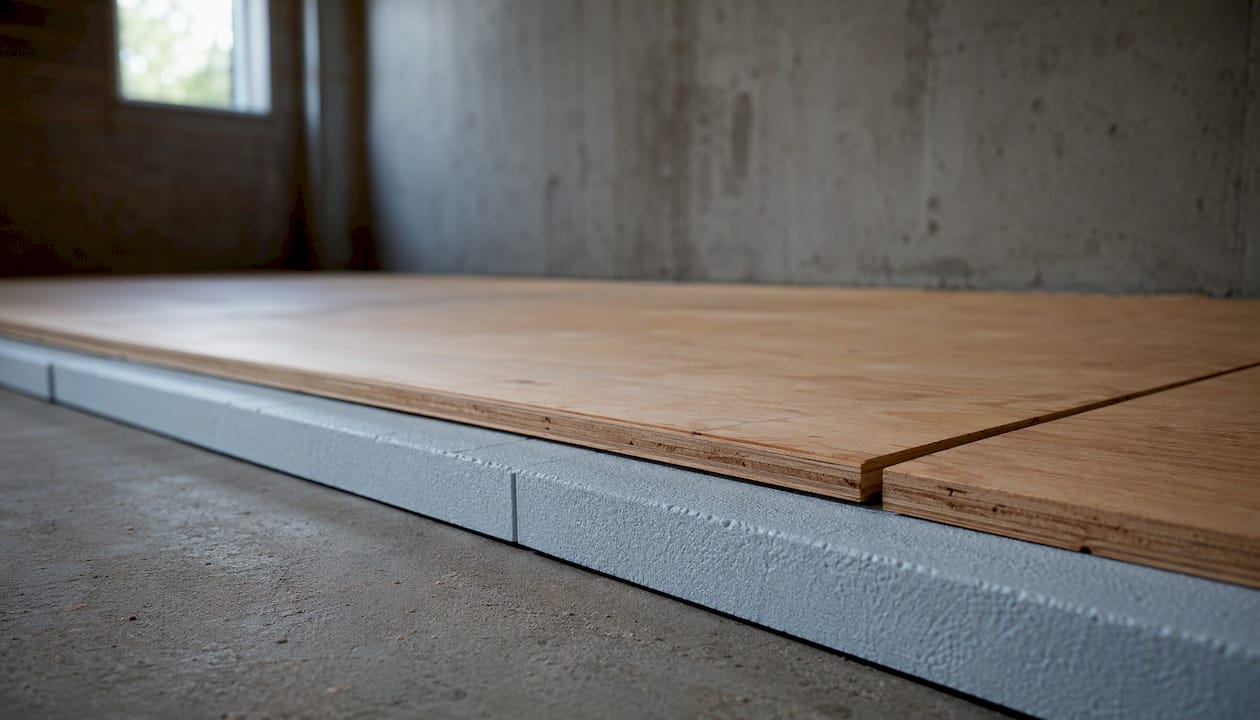
Two layers of 3/4 in. plywood glued together and floated over rigid foam is a time-tested approach that gives you a very flat, stiff substrate. It suits tile better than panel systems do, handles heavier loads, and can be shimmed for level. The trade-off is height: you gain at least 1.5–2 in., which can conflict with door clearances and stair nosings.
Sleeper systems
Pressure-treated 2x4 sleepers laid flat on the slab, shimmed level, and topped with plywood create a robust subfloor that can accommodate in-floor wiring or insulation batts between the sleepers. They work well on moderately uneven slabs and are a solid choice for tile. Height added is typically 2–3 in., and installation is more labour-intensive than panel systems.
Dimpled membranes
A thin polyethylene sheet with raised dimples (products like DMX 1-Step or Delta-FL) sits directly on the slab and creates a drainage/vapour path under a plywood or OSB layer above. Dimpled membranes relieve vapour pressure and are inexpensive, but they need a rigid layer on top before any finished floor goes down. They are not suitable under glue-down tile without additional rigid substrate.
Uncoupling membranes for tile
If tile is your finished floor, a product like Schluter DITRA laid over a concrete slab or plywood subfloor is the industry-standard approach. It decouples the tile from movement in the substrate, manages vapour, and prevents cracking. It adds minimal height (about 1/8 in.) and requires a flat, sound base.
Rigid foam full-panel systems
Insulated decking systems such as ThermalDry® combine a continuous rigid foam layer with an inorganic top board that resists mould. They are pitched as a permanent alternative to wood-based systems in high-moisture environments and are typically installed by specialists.
Compatibility at a glance:
| Subfloor system | LVP / laminate | Engineered hardwood | Carpet | Glue-down tile | Floating tile |
|---|---|---|---|---|---|
| Interlocking panels (e.g., DRICORE) | ✓ | ✓ | ✓ | Not recommended | Not recommended |
| Foam + floating plywood | ✓ | ✓ | ✓ | ✓ (with flat surface) | ✓ |
| Sleeper + plywood | ✓ | ✓ | ✓ | ✓ | ✓ |
| Dimpled membrane + plywood | ✓ | ✓ | ✓ | ✓ | ✓ |
| Uncoupling membrane (DITRA) | ✗ | ✗ | ✗ | ✓ | ✓ |
| Rigid foam panel system | ✓ | ✓ | ✓ | Check manufacturer | ✗ |
Do you actually need a subfloor in your basement?
The short answer is yes, for almost every finished basement in Canada. Concrete is porous. It conducts cold and wicks moisture regardless of how dry the space looks in winter. Basement subfloor panels prevent condensation, mold, and musty odours by keeping a ventilated air gap between the finished floor and the slab. Without that break, laminate swells, engineered hardwood cups, and carpet becomes a mould farm within a few seasons.
The decision checklist below helps you confirm whether a full subfloor is warranted or whether a simpler approach might work:
- Slab condition: cracks, efflorescence (white mineral deposits), or staining suggest active moisture movement.
- Moisture test result: a positive plastic-sheet test or high in-situ RH reading means a subfloor is non-negotiable.
- History of water entry: any past flooding or seepage means you address drainage first, then build.
- Intended finish: LVP and laminate need a moisture break; glue-down tile over a dry, primed slab is the one scenario where a full subfloor is sometimes skipped.
- Headroom: if you are already tight on ceiling height, a thinner system (dimpled membrane + thin plywood, or a 3/4 in. panel) preserves more space.
- HVAC and humidity control: a dehumidifier running year-round reduces but does not eliminate the need for a subfloor.
The one scenario where you might skip a full subfloor is a glue-down porcelain tile installation over a confirmed-dry, flat slab with a proper primer coat. That approach is uncommon in Canadian basements because seasonal humidity swings and freeze-thaw cycles keep most slabs in a state of mild vapour emission for much of the year.
Pro Tip: Spending $3–$5 per square foot on a quality subfloor system now is far less painful than a $10,000–$30,000 mould remediation job two years later. The subfloor is the cheapest insurance in a basement renovation.
How do you choose the right basement subfloor system?
Selection comes down to seven factors, ranked by how much they constrain your options:
- Moisture risk level — confirmed high moisture or past flooding narrows you to systems with proven vapour management (interlocking panels, dimpled membrane + plywood, or sleepers with foam).
- Intended finished floor — tile requires a rigid, flat substrate; LVP and laminate are forgiving over most panel systems.
- Slab flatness — panels tolerate up to about 3/16 in. variation over 10 ft.; wavy slabs need sleepers with shimming or self-levelling compound first.
- Available headroom — every inch matters when you are close to the minimum ceiling height. Interlocking panels (3/4 in.) win here; sleeper systems lose.
- Insulation requirement — if thermal comfort is a priority, look for systems with higher R-values or add rigid foam beneath a plywood float.
- Budget — panel systems run higher per square foot than a DIY dimpled-membrane-plus-plywood build, but save labour time.
- Load requirements — heavy point loads (a pool table, a safe) favour sleeper or plywood-float systems over interlocking panels.
When talking to a product rep or contractor, ask these questions directly:
- What is the system’s tested moisture tolerance, and does the warranty cover moisture-related failure?
- What R-value does the system add, and is that enough for my climate zone?
- How much height does the finished assembly add, including the finished floor?
- Can I install ceramic or porcelain tile over this system, and does the manufacturer approve that in writing?
- What slab prep does the system require, and who is responsible if the slab is not flat enough?
Canadian climate adds a specific wrinkle. A system that performs well in a climate-controlled U.S. test environment may behave differently in a Durham Region basement that sits empty and unheated for part of the year. Prioritise systems with documented Canadian performance and check whether the warranty is valid in Canadian climate conditions.
How to test, prep, and install a basement subfloor
Moisture testing first
Never skip this step. Two practical methods:
- Plastic-sheet test: tape a 600 mm x 600 mm piece of poly sheeting to the slab, seal all four edges with duct tape, and leave it for 24–72 hours. Condensation or darkening under the sheet confirms moisture movement.
- In-situ RH / MVER testing: a more precise method using a calibrated probe inserted into a drilled hole in the slab. This measures relative humidity within the concrete itself and is the standard referenced in ASTM F2170. For any system where the manufacturer’s warranty requires a moisture test, use in-situ RH.
Slab preparation
A clean, flat slab is the foundation of a successful install. Sweep and vacuum thoroughly, then patch cracks with hydraulic cement or a polyurethane crack filler rated for below-grade use. Grind down high spots with an angle grinder and a diamond cup wheel. For significant low spots, use a self-levelling underlayment rated for concrete. Slab prep, door trimming, and perimeter planning are the steps most DIYers underestimate.
Contractor note: Contractor guidance consistently recommends combining a capillary break with a vapour strategy, sealing all pipe penetrations, and targeting indoor relative humidity near 40–50% during the first summer after finishing to prevent condensation-driven mould.
Installation sequence by system
Interlocking panels: dry-lay the first row along the longest wall with a 1/4 in. expansion gap at the perimeter. Click subsequent rows together, staggering joints by at least half a panel. Cut panels with a circular saw or jigsaw. No fasteners or adhesive needed for most floating applications.
Foam + floating plywood: lay rigid foam (XPS, minimum 1 in.) across the slab, tape seams, then float two layers of 3/4 in. plywood with joints offset and layers glued together. Leave a 1/4 in. perimeter gap. Fasten the top layer to the bottom with construction adhesive and screws.
Sleeper system: lay pressure-treated 2x4s flat at 16 in. on-centre, shimming for level. Fill between sleepers with rigid foam. Top with 3/4 in. plywood, fastened to the sleepers.
Dimpled membrane + plywood: roll out the membrane, dimples down, and tape seams. Lay 3/4 in. plywood on top, leaving expansion gaps. Fasten plywood to itself (not to the slab) with construction adhesive between layers if using two sheets.
Uncoupling membrane for tile: spread thin-set on the slab, embed the membrane fleece-side down, then tile directly into thin-set applied to the membrane surface.
Tools you will need: circular saw, jigsaw, tape measure, chalk line, rubber mallet, utility knife, knee pads, and a respirator when cutting OSB or plywood (fine wood dust is a respiratory hazard).
Pro Tip: Seal every pipe penetration and the perimeter gap with acoustical sealant or low-expansion spray foam before laying your finished floor. Unsealed gaps are the most common entry point for vapour that eventually causes seam failure.
What does a basement subfloor cost in Canada?
Cost varies by system, slab condition, and whether you DIY or hire. The figures below reflect typical Canadian material and labour ranges for a standard residential basement.
Key cost drivers to budget for:
- Slab repair: crack patching and grinding runs $200–$800 depending on extent; self-levelling compound adds $1–$3 per sq ft.
- Moisture mitigation: if the slab needs a waterproofing membrane or interior drainage system, budget $3,000–$10,000+ before the subfloor goes in.
- Door and threshold adjustments: raising the floor height by 3/4 in. to 2 in. often means trimming door bottoms and adding transition strips. Budget $50–$150 per door.
- Disposal: wet or mould-contaminated materials from a previous floor require proper disposal. Costs vary by municipality.
- Warranty value: systems with 25-year limited warranties (common among prefab panel brands) add long-term value that offsets a higher upfront cost.
A typical basement subfloor using interlocking panels costs several hundred dollars in materials for a DIYer, or around twice that installed by a contractor, before any slab prep costs.
Which finished floors work over each subfloor type?
Finish compatibility is where many basement projects go wrong. The subfloor choice and the finished floor choice must be made together, not sequentially.
| Finished floor | Best subfloor match | Key prep notes |
|---|---|---|
| LVP (luxury vinyl plank) | Interlocking panels, dimpled membrane + plywood | Needs flat surface within 3/16 in. per 10 ft. |
| Laminate | Interlocking panels, foam + plywood | Requires underlayment per manufacturer; check moisture warranty |
| Engineered hardwood | Foam + plywood, sleeper + plywood | Needs stable RH; avoid direct glue to panels |
| Carpet | Any panel or plywood system | Minimal prep; check for adequate firmness |
| Glue-down ceramic/porcelain tile | Sleeper + plywood, foam + plywood, uncoupling membrane | Rigid substrate required; panels alone are not suitable |
| Floating tile | Uncoupling membrane (DITRA) over plywood or slab | Membrane decouples tile from substrate movement |
A few installer notes worth keeping in mind:
Tile is the most demanding finish in a basement. Concrete slabs flex seasonally, and tile bonded directly to a flexible or insufficiently rigid substrate will crack at the grout joints within a year or two. An uncoupling membrane over a flat slab, or a sleeper-plus-plywood build, gives tile the rigid, decoupled base it needs.
Always check the finished-floor manufacturer’s installation guide before committing to a subfloor system. Many LVP and laminate warranties are voided if the product is installed over a substrate the manufacturer has not approved. The same applies to adhesives: use only products specified for below-grade, high-moisture environments. For LVP flooring installation over a panel subfloor, the surface flatness tolerance is typically tighter than most homeowners expect.
When should you hire a contractor for basement subfloor work?
DIY is realistic for interlocking panel systems on a flat, dry slab. Beyond that, the risk of a costly mistake rises quickly.
Hire a professional when:
- There is active water entry, efflorescence, or a history of flooding. A contractor can coordinate waterproofing and drainage before the subfloor goes in.
- The slab is wavy or has significant high and low spots. Proper shimming and levelling requires tools and experience most homeowners do not have.
- You plan to install ceramic or porcelain tile. Tile over an improperly prepared substrate is one of the most common and expensive basement renovation failures.
- Headroom is tight and every millimetre matters. A professional will calculate the finished assembly height precisely and plan door and stair transitions accordingly.
- The product warranty requires professional installation. Some systems void their warranty for DIY installs.
What a professional does that a DIYer typically misses:
- Calibrated in-situ moisture testing rather than a plastic-sheet estimate.
- Slope and drainage assessment to confirm water moves toward the sump, not toward the walls.
- Permanent capillary breaks at wall-floor junctions.
- Sealed transitions at all pipe penetrations, posts, and stair stringers.
- Written documentation of prep work, which supports warranty claims later.
Questions to ask on any contractor quote:
- Does the quote include moisture testing, and what method will you use?
- What slab prep is included, and what triggers an additional charge?
- Are product warranty and labour warranty separate? How long is each?
- Does the warranty transfer to a future buyer of the home?
- What is the realistic timeline from start to finished floor?
For homeowners in Durham Region, LA Rocks Renovations’ basement services cover diagnostic moisture testing, subfloor installation, and finish flooring in a single coordinated scope. When you need to plan door trimming and threshold work after a subfloor raises your finished-floor height, it also helps to think through interior door clearances early in the planning process.
Basement subfloor permits and building codes in Canada
Most Canadian municipalities follow the National Building Code of Canada (NBC) as a base, with provincial and local amendments layered on top. The good news for most homeowners: installing a subfloor over an existing concrete slab in a finished basement typically does not require a building permit on its own. The permit trigger is usually the broader basement finishing project, not the subfloor specifically.
That said, a few code-related points apply directly to subfloor work:
Vapour control: the NBC and most provincial codes require a vapour barrier or vapour retarder on below-grade floors. A 6-mil polyethylene sheet under a sleeper or plywood system satisfies this requirement in most jurisdictions. Many prefabricated panel systems are designed to function as the vapour control layer, but confirm this with your local building department before relying on it.
Minimum ceiling height: Ontario’s Building Code requires a minimum finished ceiling height of 1,950 mm (approximately 6 ft. 5 in.) in habitable basement rooms. Every millimetre your subfloor adds comes off that ceiling height. This is the most common code conflict in low-headroom basements.
Fire separation: if your basement renovation includes a secondary suite or a bedroom, fire separation requirements between floors become relevant. The subfloor assembly may need to contribute to the required fire-resistance rating. Check with your local building department before finalising the system.
Permit requirements vary by municipality. Bowmanville, Clarington, Oshawa, Whitby, Ajax, and Pickering all fall under the Ontario Building Code but may have local amendments. When in doubt, contact your municipality’s building department before starting work. Unpermitted basement finishing work can create complications when you sell the home.
For a basement renovation in Newcastle or anywhere across Durham Region, confirming permit requirements early saves time and avoids costly rework.
What experienced basement renovators know that most guides skip
The most common mistake in basement subfloor installation is not choosing the wrong system. It is installing the right system over inadequate prep. A perfectly clicked DRICORE floor laid over a slab with hairline cracks and no moisture test will fail within two to three heating seasons in a Canadian climate. The panels will lift at the seams, the OSB will swell, and the finished floor above will buckle. The prep is the job.
The second most common mistake is ignoring height early. Homeowners pick a system, install it, and then discover the bathroom door no longer clears the floor, or the stair nosing is now a trip hazard. Plan the full finished-floor assembly height before buying anything. Add the subfloor thickness, the underlayment, and the finished floor, then check every door, threshold, and stair in the space.
A few small-win tips from the contractor side:
- Dry-lay your first two rows of panels before committing to a starting point. The layout at the far wall determines whether you end with a sliver cut or a full panel.
- On a foam-plus-plywood build, run the foam seams perpendicular to the plywood seams. It takes five minutes of planning and prevents a weak line running the full length of the floor.
- If you are planning future work under the floor (rough-in plumbing, in-floor heating), document the panel layout with photos and a simple sketch before the finished floor goes down.
- For basement framing and insulation that follows the subfloor, the sequence matters: subfloor first, then partition walls, so the walls sit on the finished floor height and transitions are clean.
LA Rocks Renovations handles basement subfloors across Durham Region
Getting a basement subfloor right means more than picking the right panel at the hardware store. It means testing the slab correctly, prepping the surface to the tolerances the system requires, and coordinating the subfloor with the finished floor, the walls, and the doors above it. That coordination is where most DIY projects run into trouble.
LA Rocks Renovations brings that full scope to homeowners in Bowmanville, Clarington, Newcastle, Oshawa, Whitby, Ajax, Pickering, and across Durham Region. A site visit includes a moisture assessment, a slab inspection, and a written estimate that covers prep, subfloor installation, and finish flooring in one clear scope. No guessing at what is included. No surprise add-ons when the slab turns out to need levelling.
If you are ready to finish your basement properly, contact LA Rocks Renovations to book a site visit and get a written quote for your project.
Sources
- What To Know About Basement Subfloor Panels
- Basement options for dry, warm floor covering
- DRICORE vs Barricade vs Tyroc (guide)
- ThermalDry® Insulated Floor Decking | Basement Subfloor System