


Drywall Corner Bead Types: a Homeowner's Guide
Dylan LarocqueRequest Your Free Estimate Today
GET A FREE ESTIMATE →Three material families cover nearly every corner bead situation you’ll encounter in a Canadian home: galvanized metal, vinyl/PVC, and paper-faced/composite. Metal is the budget-friendly workhorse for high-traffic hallways and garages. Vinyl handles moisture-prone rooms like bathrooms and basements without rusting. Paper-faced composite, used by manufacturers like Trim‑Tex, CertainTeed (NO-COAT), and Beadex, delivers the smoothest, most crack-resistant finish for painted living spaces — and it’s increasingly the standard that professional finishers reach for first.
The short verdict: For most Durham Region homeowners, paper-faced tape-on bead is the best all-around choice for living areas and high-visibility corners. Use vinyl in wet zones and metal where budget is tight and impact resistance matters more than a seamless painted finish.
- Galvanized metal: low cost, strong, but prone to rust in humid areas and can telegraph through paint (“ghosting”)
- Vinyl/PVC: moisture-proof, flexible, ideal for bathrooms and basement renovations — slightly softer than metal
- Paper-faced/composite: the professional standard for painted walls; bonds with joint compound for a seamless, crack-resistant edge
Key takeaways
Choosing the right corner bead material upfront prevents the most common finishing failures: rust bleed, ghosting, and cracked compound at the nose.
| Point | Details |
|---|---|
| Metal for impact, budget jobs | Galvanized nail-on bead suits high-traffic, dry areas where cost matters more than a seamless finish. |
| Vinyl for wet rooms | PVC bead won’t rust, making it the right call for bathrooms and basements. |
| Paper-faced for painted living spaces | Tape-on composite bead bonds with compound for a seamless, ghost-free finish on visible walls. |
| Prep is the critical step | Setting drywall back 1/16"–1/8" from the corner and cutting bead 12.7 mm short prevents the most common failures. |
| LA Rocks Renovations | Serves Durham Region homeowners with professional drywall finishing, bead selection, and paint-ready corner work. |
Table of Contents
- What are the main drywall corner bead types and profile shapes?
- How each bead type is installed
- Pros, cons and best-use cases for each material
- A quick decision checklist before you buy
- Mudding, sanding and keeping corners looking good long-term
- Where to buy corner bead in Canada
- LA Rocks Renovations pro tips and common mistakes
- Why pros are moving away from plain metal bead
- Professional drywall finishing in Durham Region
- Sources
What are the main drywall corner bead types and profile shapes?
Corner beads come in three materials and several profile shapes. Knowing both helps you pick the right product off the shelf.
Materials at a glance
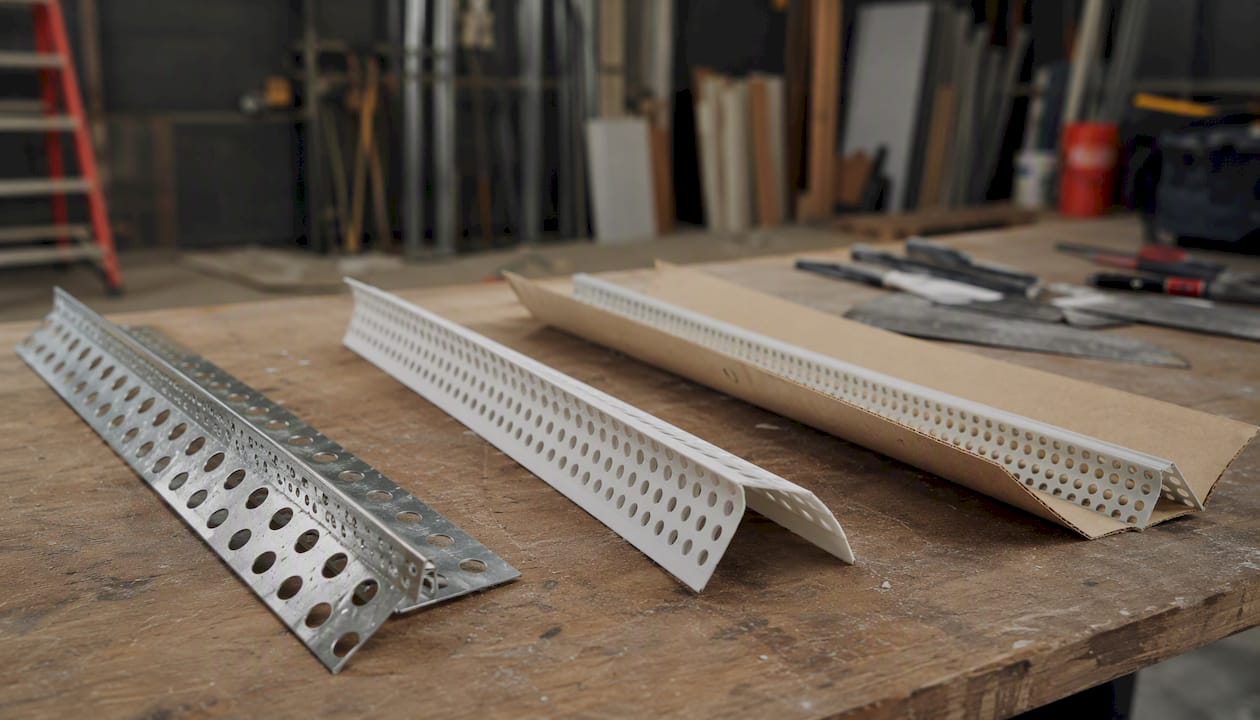
Galvanized metal beads have a bright silver look and a rigid feel. You’ll recognise them immediately — they’re the standard nail-on bead most hardware stores stock in quantity. Vinyl/PVC beads are lighter, slightly flexible, and usually white or grey. Paper-faced metal or composite beads have paper flanges on both sides of a metal or plastic nose; the paper is what you embed into joint compound, making the bead essentially invisible once finished. Paper-faced systems are now the modern professional standard for a seamless, crack-resistant finish and reduce visible bead ghosting compared with exposed metal beads.
Common profiles
| Profile | Shape | Best use |
|---|---|---|
| Outside 90° (square/sharp) | Standard right-angle nose | Most interior walls, hallways |
| Bullnose (rounded) | Curved nose, various radii | Softer look, archways, fewer chips |
| Chamfer | Angled flat bevel | Modern/contemporary interiors |
| J-bead | J-shaped channel | Panel edge terminations, window returns |
| L-bead | L-shaped channel | Drywall meeting a dissimilar surface |
| Reveal/shadow bead | Recessed groove | Accent lines, floating wall details |
| Flexible/pre-formed | Bendable roll or pre-bent | Curved walls, off-angle corners, archways |
Material comparison
| Feature | Galvanized metal | Vinyl/PVC | Paper-faced/composite |
|---|---|---|---|
| Best for | High-traffic, budget jobs | Wet/humid rooms | Painted living spaces |
| Durability/impact | High | Moderate | High (SLAM technology) |
| Moisture/rust resistance | Low (rusts) | Excellent | Good (paper can absorb if unsealed) |
| DIY ease | Moderate | Easy | Moderate (mud technique required) |
| Finish quality | Visible bead possible | Good | Seamless |
| Typical cost | Lowest | Low–moderate | Moderate–higher |
CertainTeed’s NO-COAT corners use Structural Laminate (SLAM) technology to resist blistering, denting, and cracking — available in pre-cut sticks and roll products for flexible angles.
Pro Tip: Choose paper-faced tape-on over nail-on metal whenever the corner will be painted and visible. The paper flanges feather into the compound so there’s no hard edge to show through paint — a detail that separates a professional finish from a DIY one.
How each bead type is installed
Nail-on metal bead
- Measure the wall height and cut the bead with tin snips, leaving it about 13 mm (½ in.) shorter than the full height to allow for settling.
- Set drywall sheets back slightly from the corner so the bead seats flush without rocking.
- Position the bead over the corner and press firmly.
- Fasten with ringshank nails or a corner clincher, spacing fasteners approximately 200 mm (8 in.) along each flange.
- Apply multiple coats of all-purpose joint compound, feathering each coat wider than the last.
Glue-on vinyl bead
- Cut to length with tin snips or a utility knife.
- Apply construction adhesive to both flanges, press onto the corner, and staple or fasten lightly to hold while the adhesive sets.
- Mud, feather, and sand as with metal bead.
Tape-on paper-faced bead
- Apply a generous mud bed to both faces of the corner using a 6" taping knife.
- Press the bead into the wet compound, embedding the paper flanges fully. Manufacturer guides specify cutting the bead about 13 mm shorter than wall height and embedding it into a mud bed for a secure bond.
- Smooth with a corner roller or damp sponge to remove air pockets.
- Apply two to three finish coats, feathering 200–300 mm from the nose on each side.
- Sand lightly between coats; prime before painting.
Tools you’ll need
- Tin snips (for metal and vinyl)
- Corner clincher (speeds up nail-on metal)
- Taping knives: 4", 6", and 8"
- Corner roller or damp sponge
- Ringshank nails or self-tapping screws
- All-purpose and/or setting-type joint compound
- Sanding block and 120-grit paper
Time estimate for a homeowner on a single 8 ft. outside corner: several hours spread across multiple days to allow drying, plus additional time for sanding and priming.
Pros, cons and best-use cases for each material
Galvanized metal
Metal bead is the most affordable option and holds up well to direct impact — a real advantage in a busy hallway or garage. The trade-off is rust. Store metal bead in a dry location; even brief exposure to moisture during a basement renovation can cause rust bleed through paint years later. The rigid nose also means any slight misalignment shows up as a hard line under paint, which is why many finishers call it a “callback waiting to happen” on high-visibility walls.
Vinyl/PVC
Vinyl doesn’t rust, which makes it the sensible pick for bathroom renovations and any room with regular humidity swings. It’s also slightly flexible, so it conforms better to corners that are a few degrees off square. The softer nose dents more easily than metal under a sharp impact, but for most residential rooms that’s rarely an issue.
Paper-faced/composite
Paper-faced composite beads can be highly impact-resistant and conform to off-angle corners better than traditional metal. The finish quality is genuinely superior: the paper flanges become part of the compound layer, so there’s no hard metal edge to telegraph through paint. The catch is technique — proper embedment, misting, and feathering take practice, and a poorly set tape-on bead is harder to fix than a crooked nail-on one.
Profile best uses
- Bullnose: softer look, fewer chips at the nose, popular in family rooms and children’s bedrooms
- Chamfer: clean, modern lines; pairs well with flat-panel millwork
- J-bead / L-bead: wherever drywall terminates against a window frame, door jamb, or masonry — keeps the edge clean without needing casing
- Reveal/shadow bead: adds architectural detail without trim; works well in contemporary interiors
- Flexible bead: the only practical solution for curved walls and archways; available in roll form from Trim‑Tex and similar manufacturers
A quick decision checklist before you buy
Run through these questions in order before purchasing any corner bead:
- Room type and humidity: Is the room a bathroom, basement, or laundry area? Choose vinyl or moisture-resistant composite. Dry living areas can use any material.
- Expected impact: High-traffic hallway or children’s room? Prioritise metal or impact-rated composite over standard vinyl.
- Desired finish: Will the corner be painted and visible from close range? Paper-faced tape-on gives the cleanest result. If it’s in a utility room, metal is fine.
- Corner geometry: Is the corner a true 90°? If it’s off-angle by more than a few degrees, you need flexible bead or a pre-formed product like NO-COAT’s flexible roll.
- Drywall condition: Are the sheets set back slightly from the corner? If not, correct the setback before installing any bead — it’s the leading cause of twisted or bubbled results.
- Budget: Metal is cheapest; paper-faced/composite costs more upfront but reduces rework.
- Installation skill: Comfortable with taping knives and three-coat finishing? Any bead type is manageable. New to drywall? Nail-on metal is the most forgiving starting point.
Red flags that point to hiring a pro: off-angle or curved corners, archways, high-end finishes (Level 5), tight timelines, or any corner in a room that’s already been painted and furnished.
Mudding, sanding and keeping corners looking good long-term
Finishing technique
Setting-type compound (hot mud) is useful for the first coat on tape-on beads because it hardens chemically rather than by drying, which reduces shrinkage. All-purpose compound works well for finish coats. Feather each coat at least 150–200 mm from the bead nose so the transition is gradual enough to disappear under paint.
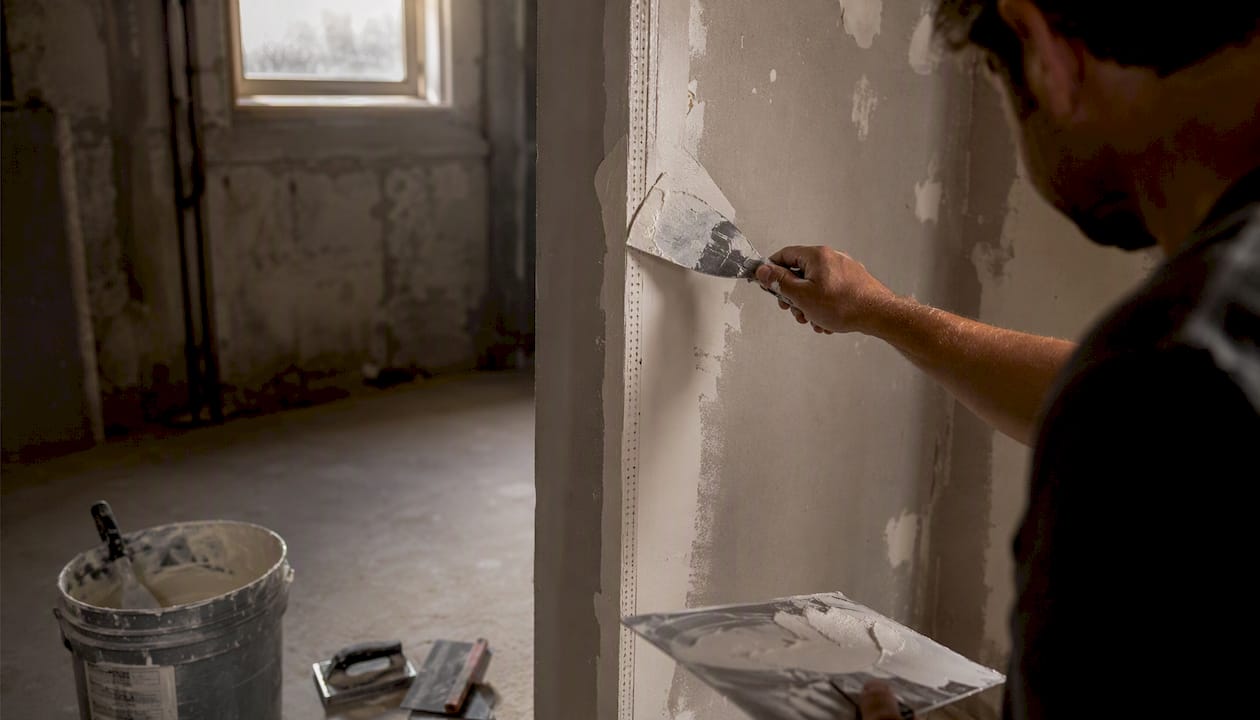
Bead “ghosting” — a faint shadow of the bead showing through paint — usually means the feathering wasn’t wide enough or the primer coat was skipped. Always prime with a PVA drywall primer before topcoating. Spacing fasteners about 200 mm apart and applying light, even pressure when seating the bead also reduces the chance of ghosting by keeping the nose perfectly aligned.
Maintenance and repair
A dented metal bead corner can often be tapped back with a rubber mallet, then skim-coated and touched up with paint. If the dent is severe or the metal has cracked, cut out the damaged section and splice in a new piece — a job that’s easier than it sounds with a multi-tool and a fresh length of bead.
Cracked compound along a corner (without bead damage) is usually a settling crack. Scrape it clean, apply a thin coat of all-purpose compound, and repaint. In bathrooms, check that caulk at the tub or shower surround is intact; water wicking behind drywall is what causes compound to fail at corners over time.
Pro Tip: In bathrooms and basements, use a caulking and sealing service at all bead terminations where drywall meets tile or a dissimilar surface. Compound alone will crack at those transitions; caulk moves with the structure.
Where to buy corner bead in Canada
Brands worth knowing
Trim‑Tex produces an extensive range of specialty trims — J-bead, L-trim, reveal profiles, and flexible rolls — with installation literature for both pros and homeowners. CertainTeed (NO-COAT and AquaBead) offers pre-cut sticks and roll products using SLAM structural laminate technology; AquaBead is specifically formulated for high-humidity areas. Beadex / CGC (USG) is widely distributed across Canada and publishes detailed dimensional catalogs listing profile radii and standard lengths (8 ft., 9 ft., 10 ft., 12 ft.) for both tape-on and nail-on options.
For standard metal and vinyl beads, Home Depot Canada stocks the most common profiles. Specialty tape-on beads, flexible rolls, and professional-grade composite products are typically available from local drywall supply yards and pro distributors across Durham Region.
Buying checklist
- Confirm the profile designation (outside 90°, bullnose, J-bead, etc.) matches your corner type
- Check whether the product is tape-on or nail-on — they are not interchangeable
- Note the bullnose radius if applicable (common options: 3/4", 1-1/4", 1-1/2")
- Order lengths that match your wall heights; standard sticks are 8 ft., 9 ft., 10 ft., and 12 ft.
- For curved walls, order flexible roll by the linear foot rather than pre-cut sticks
- Buy 10–15% extra to account for cuts and waste
LA Rocks Renovations pro tips and common mistakes
After finishing corners across Bowmanville, Clarington, and Durham Region, the team at LA Rocks Renovations sees the same mistakes repeat on homeowner projects.
Set drywall back from the corner. Sheets that run flush to the corner edge prevent the bead from seating correctly. A 1/16"–1/8" setback — confirmed by Fine Homebuilding’s guidance on crisp corners — is the single most important prep step and the one most often skipped.
Cut beads short. Always cut outside corner bead about 12.7 mm (½ in.) shorter than the wall height. A bead that bears against the floor or ceiling will crack as the structure settles.
Don’t force bead over an unprepared corner. Forcing a rigid metal bead onto a corner that’s out of square twists the nose and creates a wavy line that no amount of compound will hide. Check the corner with a square first.
Skip the mud bed and the tape-on bead fails. Paper-faced beads need a proper wet compound bed to bond. Pressing them onto dry drywall paper produces a bead that lifts within months.
Never store metal bead in damp conditions. Even a few days in a wet basement before installation is enough to start surface rust that bleeds through paint.
Check for off-angle conditions before buying. A corner that looks like 90° can easily be 87° or 93°. Use an angle finder before purchasing rigid bead — a few degrees off means flexible or adjustable bead is the right call.
From the LA Rocks Renovations team: “The corners that come back as callbacks almost always have one thing in common — the drywall wasn’t prepped before the bead went on. Get the sheets set back correctly, cut the bead short, and the rest of the finishing process is straightforward. Skip those two steps and no amount of compound will save you.”
For off-angle corners, archways, or any high-end finish project, a site consult with LA Rocks Renovations before you buy materials can save you a full redo. Reach out through the drywall finishing page to book a visit.
Common DIY installation mistakes are not unique to drywall — avoiding similar pitfalls in door replacement follows the same principle: preparation and measurement before installation, not after.
Why pros are moving away from plain metal bead
The shift is clear and it’s been building for years. Plain galvanized nail-on bead is fast to install, but it creates problems down the road: rust bleed in humid rooms, dents that crack compound, and ghosting on painted walls. Those issues generate callbacks, and callbacks cost time and money.
Paper-faced and structural laminate systems like CertainTeed’s NO-COAT address all three failure points. The paper flanges eliminate the hard metal edge that ghosts through paint. The composite nose resists denting better than standard galvanized steel. And because the bead bonds chemically with joint compound rather than relying on mechanical fasteners alone, it moves slightly with the structure instead of cracking at the nose.
Pre-formed and pre-mudded systems can also reduce joint compound usage on larger jobs, which matters when a contractor is finishing multiple rooms. For homeowners hiring a professional, this translates to a cleaner result with fewer touch-ups after the painter arrives.
The honest trade-off: paper-faced systems cost more per linear foot and require more precise mud technique. On a utility room or garage, that premium rarely pays off. On a living room, hallway, or any corner that will be scrutinised under raking light, it almost always does.
Professional drywall finishing in Durham Region
LA Rocks Renovations handles drywall installation and finishing across Bowmanville, Clarington, and Durham Region — from selecting the right bead type for each room to delivering a paint-ready Level 4 or Level 5 finish. The team works with paper-faced composite systems for living areas, moisture-resistant options for bathrooms and basements, and specialty profiles for archways and trim transitions.
Whether you’re finishing a new basement, renovating a bathroom, or repairing corners after a renovation, LA Rocks Renovations brings the material knowledge and finishing technique to get it right the first time. Contact the team for a quote or site consult — especially if your project involves off-angle corners, curved walls, or a high-end finish where the details matter.
Sources
- Navigating drywall corners: the right bead for the right angle
- CGC Beadex® Brand paper-faced metal drywall beads and trims installation guide (English)
- Crisp corners for drywall
- How to install drywall corner beads for smooth edges