


How to Handle Drywall After Water Damage
Request Your Free Estimate Today
GET A FREE ESTIMATE →Drywall after water damage can often be saved — but only under the right conditions. If the water source was clean (a burst supply line, a roof drip), the panel is still firm, and you caught it within a day or two, there is a reasonable chance to dry and repair rather than replace. Soft, sagging, or foul-smelling board, or any exposure to sewage or floodwater, means replacement is the safer call every time.
Immediate emergency checklist:
- Stop the water source first. Nothing else matters until the leak is off.
- Cut power to the affected area if water is near electrical panels, outlets, or fixtures.
- Move furniture and contents away from wet walls and floors.
- Do not run fans toward contaminated water — airborne spread of bacteria and mould spores is a real risk.
- Document everything with photos before touching anything, especially if you plan to file an insurance claim.
Quick triage: press the panel firmly with your palm. If it feels soft or crumbles, it needs to come out. A musty smell after 48 hours signals hidden moisture or early mould. Grey or black water (sewage, storm drain backup, floodwater) means the panel is a discard regardless of how firm it feels.
As Architecturecourses, repair should only begin after the water source is confirmed off and the cavity has been checked and dried. Patching over a wet cavity just hides a continuing failure.
Key takeaways
Drywall after water damage can be salvaged when the water is clean, the panel is firm, and drying begins within a day or two — but contaminated water, prolonged wetting, or soft board always requires replacement.
| Point | Details |
|---|---|
| Stop the leak first | No repair holds if the water source is still active — confirm it is off before anything else. |
| 24–48 hour mould window | Mould can begin growing within a day or two; speed of drying is the single biggest factor in avoiding it. |
| Contaminated water means replacement | Sewage, flood, and grey water require full removal — drying alone does not make porous drywall safe. |
| Verify dryness before closing | Moisture meter readings on framing and insulation must match unaffected areas before the wall is closed. |
| LA Rocks Renovations for larger jobs | For flood damage, mould concerns, or full-room restoration across Durham Region, LA Rocks Renovations provides moisture mapping, demolition, and a complete rebuild. |
Table of Contents
- How do you inspect drywall to judge the extent of damage?
- When should you repair versus replace wet drywall?
- Step-by-step DIY workflow for small to moderate drywall repairs
- How long does drywall actually take to dry after water damage?
- Health, mould, and contamination: what you need to know
- What does drywall repair actually cost in Canada?
- When should you hire a renovation contractor?
- LA Rocks Renovations: local drywall and flood restoration in Durham Region
- A local contractor’s perspective on water damage jobs
- Sources
How do you inspect drywall to judge the extent of damage?
Start with what you can see. Discolouration (yellow or brown staining), paint that is bubbling or peeling, surface cracks, and any visible sagging are all signs that moisture has penetrated beyond the paper face. Run your hand along the wall — a firm surface with only surface staining is a very different situation from a panel that flexes or dents under light pressure.
Smell matters. A musty or earthy odour, especially in a closed room, often indicates moisture trapped in the cavity or early mould growth behind the board, even when the surface looks dry.
Checking the cavity
Remove the baseboard trim carefully and look at the bottom edge of the drywall. Swelling, soft gypsum, or visible mould at the base tells you moisture has wicked up from the floor. For ceiling damage, check the attic space above if accessible. For walls, a small inspection hole cut with a utility knife (roughly 10 cm × 10 cm) lets you see whether insulation is wet and whether the framing shows staining or mould.
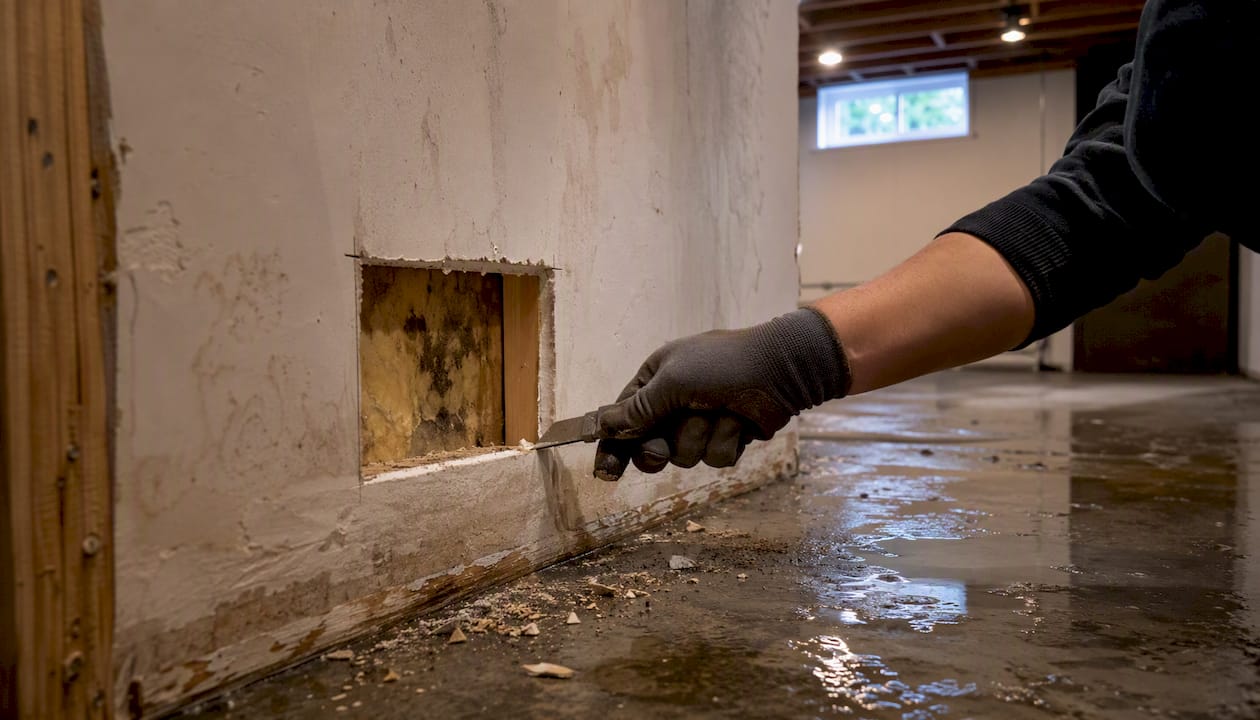
Pro Tip: Use a pin-type moisture meter and compare readings on the damaged panel against an unaffected panel in the same room. A significant difference in readings confirms active moisture rather than old staining. Professionals also use thermal imaging cameras to detect hidden wet spots without opening walls unnecessarily, as explained in how professionals test for damp.
Gypsum board is porous by nature. Left untreated, trapped moisture leads to swelling, cracking, structural weakening, and mould growth — all of which are more expensive to fix the longer they sit.
Red flags that escalate the job:
- Panel is soft, crumbly, or visibly sagging
- Musty smell persists after 48 hours of drying
- Visible mould (any colour) on the surface or framing
- Water source was sewage, a drain backup, or outdoor flooding
- Insulation behind the panel is wet or compressed
When should you repair versus replace wet drywall?
The decision comes down to four factors: water type, how long the panel was wet, the physical condition of the board, and whether the cavity (insulation and framing) is involved. RestorePro’s guidance frames it clearly: clean water caught quickly may be salvageable, while grey or black water or prolonged wetting almost always requires replacement.
| Factor | Repair (dry and patch) | Replace (remove and rebuild) |
|---|---|---|
| Water type | Clean supply line, roof drip | Grey water (appliance drain), black water (sewage, flood) |
| Exposure duration | Under a day or two | Over 48 hours, or unknown |
| Panel condition | Firm, no sagging, no crumbling | Soft, sagging, crumbling, or delaminating |
| Cavity involvement | Insulation dry, framing unstained | Wet insulation, stained or mouldy framing |
| Smell | No odour after drying | Musty or sewage odour |
Treat grey and black water as automatic replacement jobs. Drying alone does not remove the bacteria and contaminants absorbed into porous gypsum. The same logic applies to any panel that has been wet for more than two days, even from a clean source, because mould can begin growing within a day or two of sustained wetting.
Flood-cut guidance in Canadian contexts
After a basement flood or sewage backup, the standard practice is to remove drywall to a height that clears all visibly wet or stained material, then add a margin of dry board. Inspectapedia’s flood response guidance recommends removing wet and visibly mouldy drywall and continuing to a 12–24 inch margin of clean, dry material before reconstruction. Your insurance adjuster may specify a minimum cut height as a condition of the claim, so confirm that before you start demolition.
Step-by-step DIY workflow for small to moderate drywall repairs
This process applies to clean-water incidents where the panel is still firm and the cavity is dry. If any red flag from the assessment section applies, stop and call a professional.
Tools and materials you will need:
- Utility knife and drywall saw
- Moisture meter
- Stud finder
- Drywall screws and a drill
- Backing board or wood blocking (for patches without a stud)
- New drywall sheet or patch panel
- Joint compound (all-purpose or setting-type)
- Drywall tape (paper or fibreglass mesh)
- Primer (drywall-specific, PVA-based)
- Fans and a dehumidifier
- Safety glasses and dust mask
Ordered repair steps:
- Confirm the leak is off. Check the source again before touching the wall.
- Photograph the damage from multiple angles for insurance documentation.
- Remove baseboard trim carefully so it can be reused or replaced.
- Cut inspection holes at the edges of the damaged area to see into the cavity. Drain any trapped water.
- Dry the cavity with fans directed into the opening and a dehumidifier running in the room. Do not close the wall until readings confirm dryness.
- Verify moisture levels with a moisture meter. Take readings on the framing, the back of adjacent panels, and the insulation. Readings should be consistent with unaffected areas of the same room before you proceed.
- Cut out the damaged drywall to the nearest studs on each side, creating a clean rectangular opening.
- Replace wet insulation if applicable. Wet Matt insulation does not recover its R-value after drying and should be discarded.
- Install backing (blocking or a backer board) if the patch does not land on studs.
- Screw in the new panel, keeping fasteners 30 cm apart and slightly recessed.
- Tape and apply joint compound in thin coats, feathering edges. Allow each coat to dry fully before the next.
- Sand, prime, and paint to match the surrounding wall.
Safety note: Stop DIY work and call a professional if you find mould covering more than roughly 0.9 square metres (about 10 square feet), if there is any sewage exposure, or if you suspect structural damage to framing.
How long does drywall actually take to dry after water damage?
Drying timelines vary considerably depending on the size of the wet area, whether the cavity is involved, and how much airflow and mechanical drying you can apply.
| Scenario | Typical drying time | Notes |
|---|---|---|
| Small clean leak, surface only | a day or two | Fans and dehumidifier running |
| Moderate wetting, cavity accessible | 2–4 days | Inspection holes open, mechanical drying |
| Exterior room, good ventilation | 2–4 weeks | Natural or mechanical drying |
| Interior room, limited ventilation | 4–6 weeks or more | Mechanical drying strongly recommended |
| Contaminated or flood-exposed panel | Discard — do not attempt to dry | Replacement required |
UNL Extension’s flood restoration guidance confirms that exterior rooms with good ventilation may take 2–4 weeks to dry, while interior rooms with limited airflow can take 4–6 weeks or more. Mechanical drying shortens those timelines significantly.
Lightspeed Restoration notes that small, clean-water leaks caught quickly often dry in a day or two with proper equipment, while moderate wetting may take 2–4 days of active drying.
How to dry effectively
Position fans to push air across the wall surface and through any inspection holes into the cavity. A dehumidifier running in the same room pulls moisture out of the air as it evaporates from the wall. Controlled heat (keeping the room at a normal indoor temperature, roughly 20–22°C) helps, but avoid extreme heat, which can cause the gypsum to crack.
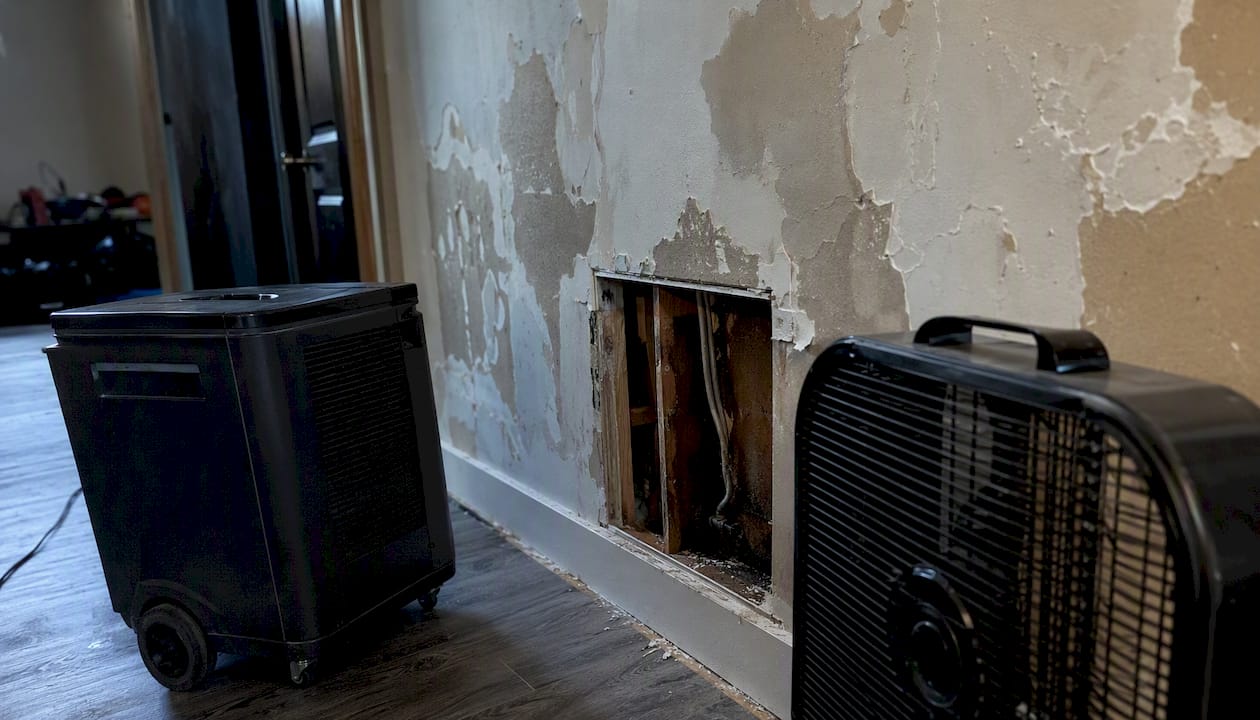
Pro Tip: Resist the urge to close inspection holes early. The cavity almost always takes longer to dry than the surface. Take moisture meter readings every 24 hours and only close the wall when readings on the framing match those in an unaffected part of the room.
Natural drying alone is a reasonable choice only for very small surface leaks in well-ventilated rooms. Basements, interior bathrooms, and any room without exterior windows need mechanical drying to reach safe moisture levels within a practical timeframe.
Health, mould, and contamination: what you need to know
Water damage carries health risks that go beyond the structural. Mould can begin growing within a day or two of sustained wetting, and contaminated water introduces bacteria and pathogens that gypsum absorbs readily.
PPE checklist for any drywall demolition or cleaning:
- N95 respirator or half-face respirator with P100 filters
- Safety glasses or goggles
- Nitrile or rubber gloves
- Disposable coveralls or clothes you can wash immediately
- Rubber boots for flood or sewage work
Contaminated water rules
Sewage backups, storm drain overflows, and outdoor flooding all introduce black water. Porous materials including drywall and insulation that have contacted black water must be removed and discarded. Inspectapedia’s flood response protocol is clear: wet and visibly mouldy drywall should be removed, with a 12–24 inch margin of clean material beyond the visible damage. Drying alone does not render contaminated gypsum safe.
Grey water (from appliance drains, dishwashers, or washing machine overflows) sits in a middle category. Industry practice treats it as a replacement job for any panel that was in prolonged contact, because the contamination threshold is difficult to verify without lab testing.
Mould covering more than roughly 0.9 square metres (10 square feet) warrants a mould remediation specialist rather than a DIY removal. In Ontario, public health guidance recommends professional assessment for larger mould areas, and some insurance policies require a certified remediator’s report before they will pay a claim.
Containing the work area
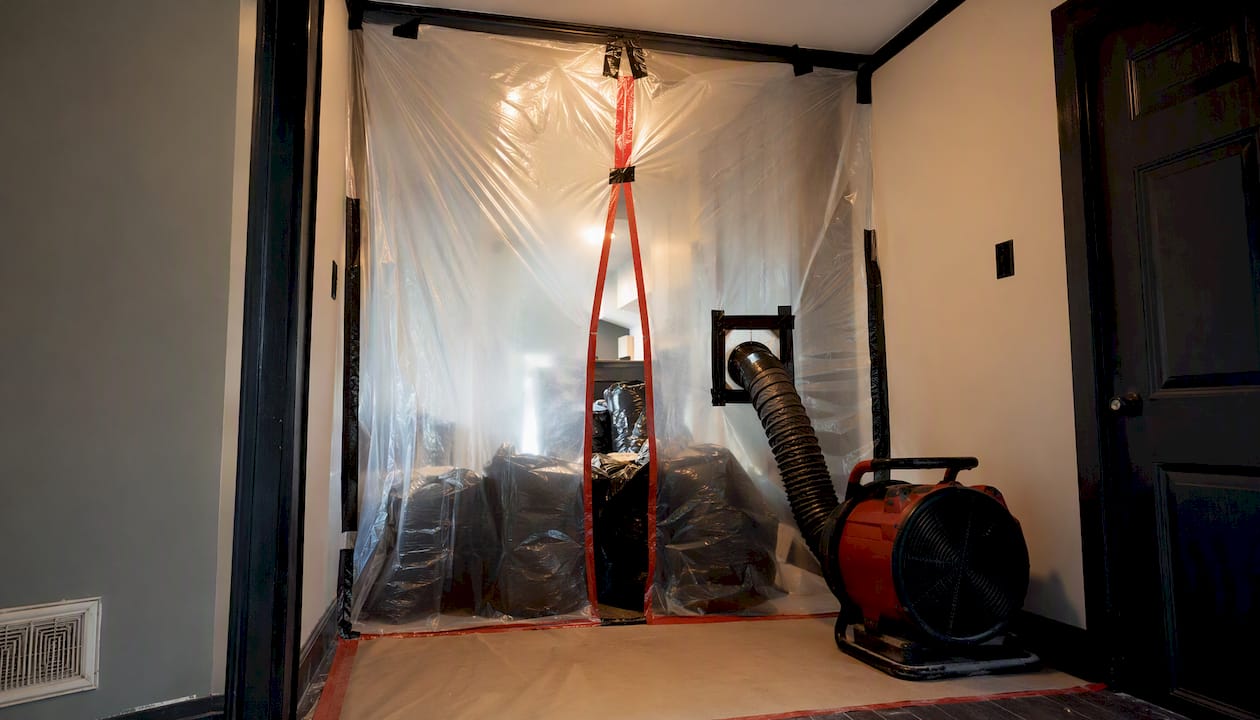
Seal doorways with plastic sheeting and tape before cutting or removing drywall. Run a fan exhausting air to the outside (not to another room) to create negative pressure in the work area. Bag all removed material in heavy-duty plastic bags and seal them before carrying through the house. Check your local municipality’s guidelines for disposal of potentially contaminated building materials, as some regions in Durham require specific drop-off or bagging protocols.
What does drywall repair actually cost in Canada?
Costs vary by scope, but having a realistic range helps you decide whether to DIY or hire a contractor before you start.
| Item | Approximate Canadian cost |
|---|---|
| Moisture meter (pin-type, entry level) | $30 |
| Dehumidifier rental (per day) | $50 |
| Box fan or air mover rental (per day) | $25 |
| 4’ × 8’ drywall sheet | $18 |
| Joint compound (pail) | $15 |
| Drywall primer (1 L) | $15 |
| Small DIY patch job (materials only) | a few hundred dollars |
| Contractor labour for small repair | $200 |
| Full room drywall replacement + finishing | $1,500 |
Select Home Warranty’s repair guide notes that small repairs typically run around a few hundred dollars for materials, but drying equipment, insulation replacement, and contractor labour push costs substantially higher for larger jobs.
What a contractor’s quote should include:
- Moisture mapping (meter readings and/or thermal imaging)
- Scope of removal with cut-height justification
- Drying equipment and timeline
- Insulation replacement if required
- Drywall supply, installation, and finishing to the appropriate level
- Priming and painting of repaired areas
- Debris removal and disposal
- Documentation for insurance if applicable
If a quote omits moisture verification or disposal, ask why. Those are not optional line items on a water damage job.
When should you hire a renovation contractor?
Some situations are straightforward DIY. Others are not, and misjudging the line costs more in the long run.
Hire a professional when:
- The water source was sewage, a drain backup, or outdoor flooding
- Mould covers more than roughly 0.9 square metres (10 square feet)
- The ceiling is sagging or the framing appears compromised
- You cannot identify the water source with certainty
- The damage is in a basement or interior room with no exterior ventilation
- Your insurance claim requires a contractor’s documentation or a certified remediator’s report
What a contractor does differently
A professional brings moisture mapping equipment (pin meters, non-invasive meters, and often thermal imaging cameras) that locates hidden wet zones without unnecessary demolition. They document readings before and after drying for insurance purposes, handle flood inspection and damage reporting as part of the scope, and can arrange structural bracing when significant wall sections come out. For basement flood work, staged drying and phased closures are standard practice to verify dryness at each layer before the next goes in.
Questions to ask during the estimate:
- Are you insured and do you carry WSIB coverage in Ontario?
- What certifications do your crew hold for mould or water damage work?
- How do you verify dryness before closing the wall?
- What is your removal height and how did you determine it?
- How will you contain dust and contamination during demolition?
- What does your disposal plan include for contaminated materials?
- What does the quote include for finishing and painting?
Red-flag answers to avoid: A contractor who offers to patch over wet drywall without opening the cavity, cannot explain their moisture verification method, or provides a quote with no line item for drying or disposal is cutting corners that will cost you later. For a typical small repair (one or two panels, clean water), expect a professional turnaround of several days including drying time. A larger flood remediation in a basement can run 2–4 weeks from demolition to finished walls.
LA Rocks Renovations: Local Drywall and Flood Restoration in Durham Region
When the damage is bigger than a patch, or the water source raises contamination concerns, having a local contractor who knows the job from demolition through to finished walls makes a real difference.

LA Rocks Renovations serves homeowners across Durham Region, including Bowmanville, Clarington, Newcastle, Oshawa, Whitby, Ajax, and Pickering. The team handles the full scope of water damage restoration: moisture mapping and flood inspection, drywall demolition and material disposal, framing checks, new drywall installation and finishing, and interior painting to bring the room back to its original condition. For basement flooding, LA Rocks Renovations also offers complete basement restoration, including staged drying and phased rebuilds that protect against repeat failures.
A site assessment typically includes moisture readings across the affected area, a clear scope of work, and a preliminary quote so you know exactly what the job involves before any work begins. To book an assessment or request a quote, contact LA Rocks Renovations directly through the website.
A local contractor’s perspective on water damage jobs
Water damage jobs have a way of looking smaller than they are. A homeowner sees a stained panel and assumes a patch will fix it. What the stain often signals is a wet cavity, saturated insulation, and framing that has been damp long enough to start growing mould behind a surface that still feels firm to the touch.
At LA Rocks Renovations, the approach on every water damage call is the same: take moisture readings first, open the wall where the numbers say to, and do not close anything until the readings confirm it is dry. That sequence protects the homeowner from a repeat failure six months later and protects the crew from working in a space that has not been properly assessed.
The most useful thing a homeowner can do before a contractor arrives is stop the leak, keep the area ventilated, and resist the urge to patch or paint over the damage. Covering a wet surface delays the drying process and makes accurate moisture mapping harder. Leave the wall open, keep the room dry, and let the assessment drive the scope.
Sources
The following sources informed this guide and offer additional depth for homeowners who want to go further:
- Initial restoration for flooded buildings (UNL Extension)
- Architecturecourses
- Dry out procedure after a building flood (Inspectapedia)
- What happens to drywall after water damage (RestorePro)
- How to fix water damaged drywall (Select Home Warranty)