


Fence Post Repair Methods Every DIY Homeowner Should Know
Request Your Free Estimate Today
GET A FREE ESTIMATE →For a leaning post with sound wood, a galvanized ground spike or steel post mender is the fastest durable fix. A cracked or heaved concrete footing calls for a full concrete reset. Rot limited to the bottom few inches is often salvageable with a steel sleeve or mender, while a post that crumbles above grade needs full replacement.
Quick method match:
- Leaning post, wood is sound: drive-in ground spike or Simpson Strong-Tie E-Z Mender style steel mender
- Cracked or heaved footing, wood is sound: dig out, clear old concrete, reset and repour
- Rot at grade only, solid above: steel sleeve or mender; cut back rot first
- Rotted through or snapped above ground: full post replacement
Call a pro before you start if the post is a gate post, a corner post carrying significant load, or if you have any doubt about buried utilities. Multiple adjacent failing posts also signal a systemic problem worth a professional assessment.
Key takeaways
The right fence post repair method depends on wood condition, footing condition, post load, and local frost depth — matching the fix to the actual failure mode is what determines whether the repair lasts.
| Point | Details |
|---|---|
| Match method to failure mode | Concrete reset for footing failure, steel mender for rot at grade, full replacement for above-grade rot. |
| Clear old concrete completely | New concrete must bond to native soil; leaving fragments behind is the leading cause of early repair failure. |
| Frost depth drives embedment | Bury at least one-third of post length and verify local frost depth; shallow footings are the primary cause of heave in Ontario. |
| Steel menders outlast wood in the ground | When above-grade wood is solid, a properly driven steel mender often provides a stronger, longer-lasting fix than a full concrete reset. |
| LA Rocks Renovations | Offers post repair, replacement, and full fence installation across Durham Region with on-site diagnosis and concrete footing work. |
Table of Contents
- What tools and materials do you need for each repair method?
- How does a concrete reset work, and when is it the right choice?
- Is rigid expanding foam a good alternative to concrete?
- How do galvanized ground spikes and steel post menders work?
- Can you repair a rotted fence post without replacing it?
- How do you choose the right repair method for your situation?
- What contractor mistakes should you avoid when repairing fence posts?
- When should you hire a contractor instead of doing it yourself?
- LA Rocks Renovations’ perspective on fence post repairs
- LA Rocks Renovations fence repair and replacement services in Durham Region
- Sources
What tools and materials do you need for each repair method?
Gathering everything before you dig saves a second trip to the hardware store and keeps the post braced safely while you work.
Concrete reset
- Post-hole digger or digging bar, pry bar to break out old concrete
- Gravel (clear stone, 3/4-in. crushed) for drainage base
- Bagged fast-setting concrete mix: Quikrete Fast-Setting Concrete Mix or Sakrete Fast-Setting Concrete (both widely available at Home Depot Canada and Rona)
- Two lengths of 2x4 lumber for bracing, plus stakes and screws
- Level (4-ft. preferred), measuring tape
- Bucket and hoe or paddle mixer for standard mix
- End-cut wood preservative (for any fresh cuts on pressure-treated posts)
Rigid expanding-foam post fix
- Sika Post Fix rigid expanding foam (available at Home Depot Canada and most Canadian building centres)
- Post-hole digger or hand trowel to clear loose soil
- Bracing lumber and level
- Gloves and eye protection (foam expands quickly)
Steel post menders and ground spikes
- Simpson Strong-Tie E-Z Mender or equivalent galvanized steel post mender
- A galvanized drive-in style post spike
- Sledgehammer or post driver, driving cap (protects the spike head)
- Carriage bolts, washers, and nuts (hot-dipped galvanized or stainless); connector screws as specified by the mender manufacturer
- Reciprocating saw or handsaw to cut back rotted wood
- Gravel for backfill collar if desired
Full replacement and splice/sistering
- A pressure-treated replacement post rated for ground contact appropriate for Canadian soil conditions
- All of the concrete reset tools above
- Mending plates or structural connector plates for sistering
- Lag screws or carriage bolts, 3/8-in. minimum diameter
Safety gear for all methods
- Safety glasses and work gloves (always)
- Steel-toed boots when sledging or driving spikes
- Call Ontario One Call (1-800-400-2255) or your regional utility locator before any digging deeper than 30 cm
Pro Tip: Pick up end-cut sealer the same day you buy your post. Any fresh cut on pressure-treated lumber exposes unprotected wood fibre; sealing it immediately adds years to the post’s service life.
How does a concrete reset work, and when is it the right choice?
A concrete reset is the most durable fence post repair method when the post wood is structurally sound but the footing has cracked, heaved, or never set properly. It takes more labour than foam or a spike, but it addresses the root cause rather than working around it.
Step-by-step concrete reset
- Brace the post plumb. Screw two 2x4 braces to the post at opposing 45-degree angles, staked into the ground, before you dig. The post must stay plumb while concrete cures.
- Dig out the footing. Use a post-hole digger or digging bar to expose the full depth of the existing footing. For a 6-ft. fence post, This Old House recommends a 36-inch embedment to reduce frost-heave risk in cold climates.
- Remove all old concrete. Break out every chunk with a pry bar and haul it away. New concrete must bond to undisturbed native soil, not to fragments of the old pour.
- Add a gravel drainage base. Pour 4–6 inches of 3/4-in. crushed gravel into the bottom of the hole. This prevents water from pooling under the post and reduces frost-heave pressure.
- Check post depth and plumb. Lower the post to the correct depth, confirm it is plumb on two adjacent faces, and tighten the braces.
- Mix and pour concrete. For a fast-setting mix like Quikrete Fast-Setting, pour dry mix directly into the hole and add water per the bag instructions. For standard 3,000-psi mix, combine in a bucket first. Fill to about 2 inches below grade.
- Crown the concrete above grade. Mound the top of the pour slightly so it slopes away from the post on all sides. This sheds water and prevents pooling at the wood-concrete interface, which is where rot typically starts.
- Cure before reloading. Fast-setting mixes typically reach working strength within 20–40 minutes, but leave fence panels off for at least 24 hours. Standard mixes need a minimum of 48 hours before reattaching panels, and full cure takes 28 days.
Pros: Most durable long-term fix; addresses footing failure directly; suitable for gate and corner posts when done to full depth.
Cons: Highest labour and time investment; requires breaking out old concrete; not practical in frozen ground.
Curing note: Fast-setting concrete reaches initial set in 20–40 minutes in typical conditions. Do not reattach fence panels or apply lateral load until at least 24 hours have passed.
Pro Tip: Never pour new concrete on top of old concrete fragments. This Old House identifies this as the single most common cause of early repair failure — the new pour has nothing solid to grip.
Is rigid expanding foam a good alternative to concrete?
Rigid foam post fixes like Sika Post Fix are genuinely useful for certain situations, but they are not a straight swap for concrete in Canadian conditions.
Home Depot Canada cautions that rigid expanding-foam products marketed as concrete alternatives can perform worse over time than properly installed concrete footings in variable climates. Ontario’s freeze-thaw cycles are demanding, and foam’s long-term behaviour under repeated frost-heave pressure differs from that of a dense concrete footing.
Step-by-step foam post fix
- Clear the base. Remove loose soil, debris, and any crumbling old concrete from around the post base. You do not need to dig a full new hole, but the cavity must be clean.
- Position and brace the post plumb. Use the same 2x4 brace method as the concrete reset. Foam sets fast; you will not get a second chance to adjust.
- Follow product instructions exactly. Sika Post Fix, for example, uses a two-part cartridge that mixes on injection. Insert the nozzle, fill to the recommended level, and stop. Overfilling wastes product and can push the post out of plumb.
- Allow full cure before removing braces. Most rigid foam products reach handling strength within 3–5 minutes and full strength within 15–30 minutes, but leave braces in place for at least an hour.
- Test stability before reattaching panels. Push the post laterally; it should feel solid with no rocking.
Pros: Very fast; minimal digging; good for soft soils where a full excavation is difficult; useful as a temporary repair.
Cons: Generally less durable than concrete in freeze-thaw climates; not recommended for gate posts or exposed, high-wind sites; foam can degrade over time with moisture cycling.
Use foam when speed matters more than longevity, the post carries light loads, or digging is genuinely impractical. For gate posts, corner posts, or any post that takes repeated lateral force, concrete is the better choice.
How do galvanized ground spikes and steel post menders work?
Steel menders and drive-in ground spikes transfer load to undisturbed soil below the rot zone, and because steel does not rot, they often outlast new wood in the ground. This makes them the most cost-effective long-term solution when the post above grade is still structurally sound.
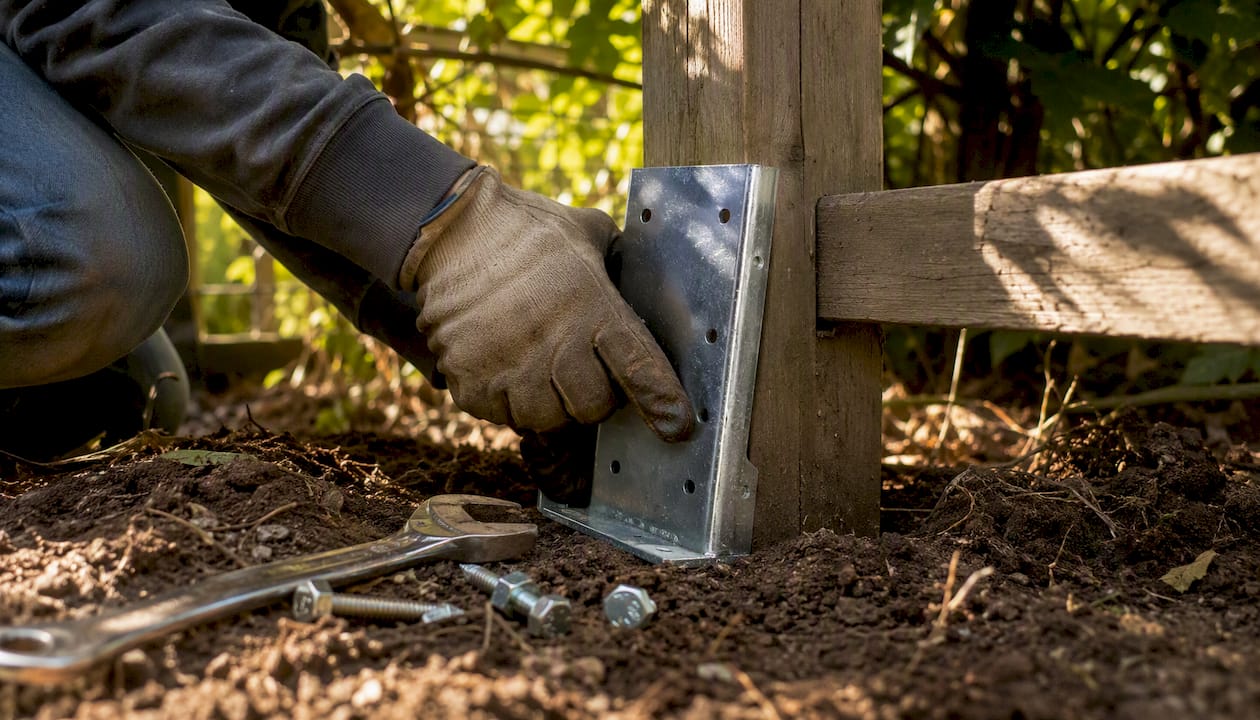
Simpson Strong-Tie documents the E-Z Mender installation as a straightforward sequence: expose the base, brace the post, slide the mender in place, drive the spike, and fasten.
Step-by-step steel mender installation
- Expose the post base. Dig down 4–6 inches around the post to expose the rot zone and give the mender room to seat properly.
- Cut back rotted wood. Use a reciprocating saw to cut the post above the rot line, leaving a clean, sound wood surface for the mender to grip.
- Slide the mender over the post stub. The mender’s socket fits over the trimmed post end. Confirm the post is plumb before driving.
- Drive the spike to depth. Using a driving cap and sledgehammer or post driver, drive the spike at least 11 inches into undisturbed soil below the old footing. Deeper is better in loose or sandy soils.
- Fasten with connector screws or carriage bolts. Follow the manufacturer’s fastener schedule. For Simpson Strong-Tie products, use the specified connector screws; for other menders, hot-dipped galvanized carriage bolts through pre-drilled holes are standard.
- Backfill and optionally add a small concrete collar. Compact gravel or native soil around the spike base. A small concrete collar at grade adds lateral stability in loose soils.
- Test and reattach panels. No cure time is needed; the fence can be reloaded immediately after fastening.
Pros: No concrete cure time; steel does not rot; fast installation; reusable if the post ever needs replacement again.
Cons: Visible at grade level (cosmetic consideration); requires sound above-grade wood; spike driving can be difficult in rocky or heavily compacted soils; use hot-dipped galvanized or stainless hardware near coastal or high-humidity sites to prevent corrosion.
For a galvanized post spike starting fresh (no existing post), the process is similar: drive the spike to full depth with a driving cap, insert the new post, and bolt through the pre-drilled holes.
Can you repair a rotted fence post without replacing it?
Lowe’s guidance confirms that minor rot limited to the bottom few inches can often be stabilised rather than replaced, while rot that penetrates above grade typically requires full replacement. The key is an honest assessment before you commit to a repair.
Assessment checklist
- Screwdriver probe test: push a flat-head screwdriver firmly into the post at and just above ground level. Sound wood resists; soft, punky wood that the screwdriver sinks into easily signals rot. FixUpFirst recommends this as the first diagnostic step before choosing any repair method.
- Dig 2–4 inches to inspect the transition zone. Rot often starts below grade where you cannot see it. Expose the wood-soil interface and probe the full perimeter.
- Check for a crumbling core. If the centre of the post is hollow or crumbles when probed, the structural fibres are compromised. A steel sleeve cannot restore a post that has lost its core.
- Look for continuous rot above grade. Any rot that extends more than a few inches above the soil line means the post cannot safely carry fence load, even with a mender.
Repair options for limited rot
- Steel sleeve or mender: the preferred fix when rot is confined to the bottom 4–6 inches and the above-grade wood is solid. Cut back to sound wood, install the mender as described above.
- Sistering with mending plates: bolt a new length of pressure-treated lumber alongside the damaged section using structural mending plates and carriage bolts. Useful when the rot zone is mid-post and the footing is still sound.
- Wood filler: appropriate only for very minor surface checking or small voids, not for structural rot. Use an exterior-grade epoxy wood filler, allow full cure, and prime before painting or staining.
- Preservative treatment: after any repair, coat all exposed end cuts and the soil-contact zone with a copper-based end-cut preservative. For cedar fence restoration, a penetrating oil or sealer applied annually to above-grade wood significantly slows moisture ingress.
Pro Tip: Never bury untreated wood in soil. If you are sistering or splicing, use UC4B-rated pressure-treated lumber for any section that will contact or approach grade. Crown the concrete around the base so water runs away from the post rather than pooling at the wood-concrete joint.
How do you choose the right repair method for your situation?
The four primary deciding factors are: the condition of the wood above grade, the condition of the footing, the load the post carries, and your local frost depth.
- Leaning post, wood is sound, footing cracked or heaved: concrete reset is the most durable choice. FenceAdvisors ranks this as the preferred fix for posts that have shifted due to footing failure rather than wood decay.
- Leaning post, wood is sound, footing intact: a steel mender or ground spike driven alongside the existing footing can restore plumb without a full dig-out.
- Rot at grade, solid above: steel sleeve or mender. Steel does not rot and can outlast new wood in the ground, making it a cost-effective long-term option when the above-grade section is structurally sound.
- Rotted through or snapped above grade: full post replacement. No surface repair restores a post that has lost its structural core.
Rough cost and effort comparison
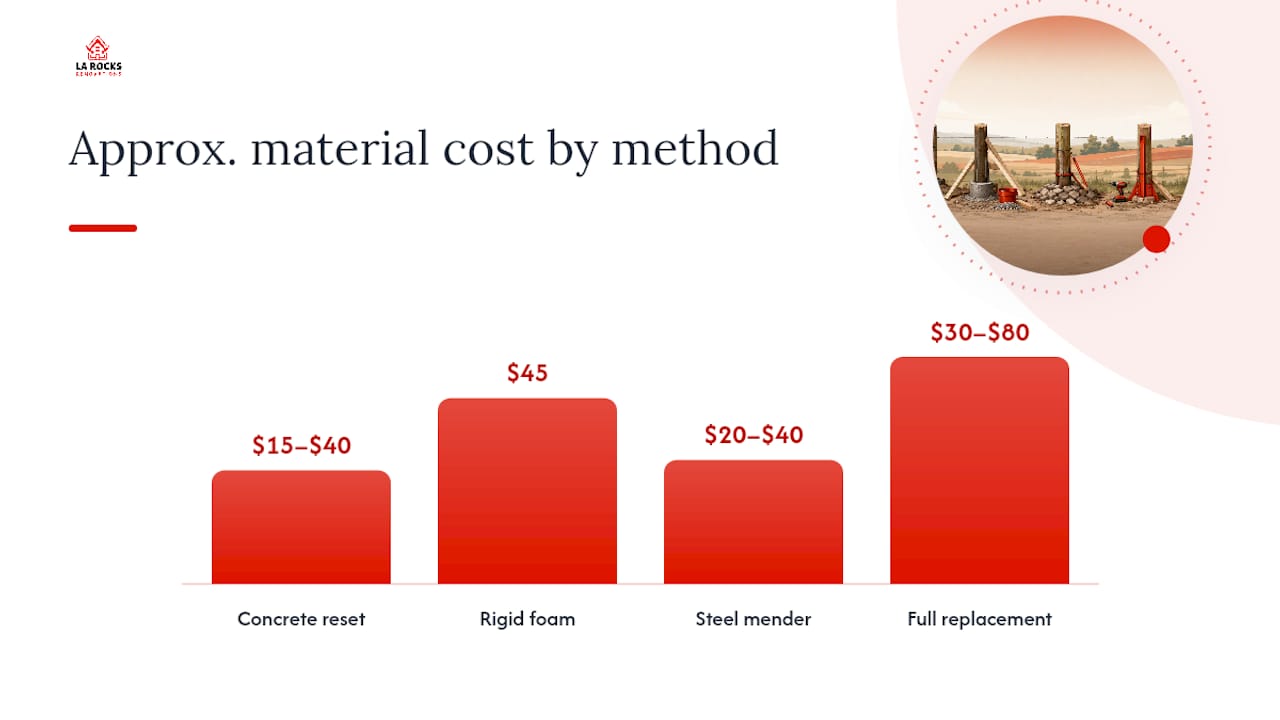
| Method | Approx. material cost (CAD) | DIY difficulty | Cure/reload time | Expected lifespan |
|---|---|---|---|---|
| Concrete reset | $15–$40 per post | Moderate | 24–48 hrs | 15 years |
| Rigid foam (Sika Post Fix) | $45 per post | Easy | 15–30 min | 5–15 years (climate-dependent) |
| Steel mender / ground spike | $20–$40 per post | Easy-Moderate | Immediate | 20+ years |
| Full replacement | $30–$80 per post | Moderate-Hard | 24–48 hrs | 20–30 years |
Frost depth and embedment
Ontario’s frost line ranges from roughly 1.2 m to 1.5 m depending on location. As a general rule, bury at least one-third of the total post length, and check your local municipality’s requirements for the actual frost depth in your area. Shallow footings are the leading cause of frost-heave failure in Durham Region and across much of Ontario.
What contractor mistakes should you avoid when repairing fence posts?
The most preventable repair failures come from shortcuts that seem reasonable in the moment.
Clear old concrete completely. Pouring new concrete on top of old fragments is the most common error contractors see. The new pour cannot bond to native soil through a layer of broken concrete, so the footing fails again within a season or two. Break out every piece and haul it away before you mix a single bag.
- Topping old concrete without clearing: produces a weak, unbonded layer that heaves independently
- Shallow footings: anything less than one-third of post length is vulnerable to frost heave in Ontario winters
- No crown for drainage: a flat or concave concrete top traps water at the wood-concrete interface, accelerating rot
- Burying wood without a gravel base: standing water under the post end is a direct path to rot; 4–6 inches of crushed gravel solves this
- Wrong hardware: standard zinc-plated screws corrode quickly in soil contact; use hot-dipped galvanized or stainless fasteners throughout
- Skipping end-cut sealer: every fresh cut on pressure-treated lumber needs sealer applied within minutes of cutting
Pro Tip: Before any digging, call Ontario One Call at 1-800-400-2255 (or 811) to have underground utilities marked. Gas, hydro, and communications lines are buried at varying depths across Durham Region, and striking one is a serious safety risk.
Safety reminders: wear eye protection when breaking concrete, hearing protection when driving spikes with a sledgehammer, and gloves when handling pressure-treated lumber or concrete mix. Never work alone when lifting heavy posts or operating a post driver.

When should you hire a contractor instead of doing it yourself?
Some fence post problems are straightforward DIY work. Others carry enough risk or complexity that a professional assessment pays for itself.
Hire a contractor when:
- The post is a gate post or corner post carrying significant lateral and vertical load. These posts require footings below the frost line and precise plumb alignment; an undersized or misaligned footing will fail under gate weight.
- Multiple adjacent posts are failing. Three or more failing posts in a row usually indicate a systemic problem: soil movement, drainage issues, or original installation errors. Fixing one post at a time without addressing the cause produces a cycle of repairs.
- You cannot confirm the location of underground services. Even after calling Ontario One Call, some privately installed lines (irrigation, low-voltage lighting, gas to outbuildings) are not on record. A contractor with experience in the area knows where to look.
- The post crumbles above grade or the fence leans significantly. Significant above-grade rot or a large lean means the fence panels themselves may be stressed; a pro can assess whether panels, rails, and hardware also need attention.
- You have had repeated DIY repair failures on the same post. Recurring failure usually means the root cause (frost heave, drainage, undersized footing) has not been addressed.
- You lack the tools or physical capacity for concrete work. Breaking out old concrete footings and setting new ones is demanding work; renting a power auger or hiring out the labour is often the practical choice.
A professional contractor also brings knowledge of local frost depths, soil conditions, and any applicable municipal requirements for fence height and setback in Durham Region. For structural repairs of any kind, that local knowledge matters.
LA Rocks Renovations’ perspective on fence post repairs
The most common mistake seen on fence repair calls across Durham Region is not the wrong method — it is choosing a method before diagnosing the actual failure mode. A homeowner who drives a ground spike into a post that has rotted 18 inches above grade has spent money on a repair that will fail within a season. The spike is not wrong; the diagnosis was.
The workflow that produces reliable results starts with the screwdriver probe and a shovel, not a product. Expose the base, probe the wood at and above grade, check the footing for cracks or movement, and only then select the method. In most cases across Durham Region, the failure is one of three things: frost heave on a shallow footing, rot at grade on a post that was never properly crowned, or original installation with no gravel base. Each of those has a clear fix.
Steel menders are genuinely underused by DIYers. When the above-grade wood is solid, a properly driven mender with a concrete collar is often a stronger long-term repair than a full concrete reset, because the steel anchor reaches below the frost zone without requiring a full excavation. The repair is also faster and less disruptive to the fence panels.
One pattern worth noting: posts that fail repeatedly after DIY repair almost always have a drainage problem. Water is pooling at the base, either because the concrete was never crowned or because the grade around the post slopes toward the fence line. Fixing the post without fixing the drainage is a temporary solution.
LA Rocks Renovations fence repair and replacement services in Durham Region
When a fence post repair turns out to be bigger than one post, or when you would rather have it done right the first time, LA Rocks Renovations handles the full scope: post repair, post replacement, concrete footings, steel post inserts, and full fence installation across Durham Region. The team works in Bowmanville, Clarington, Newcastle, Oshawa, Whitby, Ajax, Pickering, and surrounding communities.
Whether the job is a single leaning post or a full fence line that needs new footings below the frost line, the process starts with an on-site assessment. LA Rocks Renovations diagnoses the root cause first, then recommends the repair that makes sense for the post condition, soil, and load. For homeowners in Clarington and the surrounding area, that local knowledge of frost depths and soil conditions means repairs that hold through Ontario winters.
Request a site visit and quote at LA Rocks Renovations.
Sources
- How to Replace a Rotted Fence Post - This Old House
- How to fix a leaning fence post — Home Depot Canada
- DIY: Easy fence post repair - Strong‑Tie blog
- How to Repair or Replace a Fence Post Without Removing the Fence
- How to Fix a Broken Fence Post: Repair vs. Replace (2026)