


Basement Soundproofing Ceiling: DIY Plan for Homeowners
Request Your Free Estimate Today
GET A FREE ESTIMATE →The most reliable approach to soundproofing a basement ceiling combines decoupling, insulation, added mass, and airtight sealing into one layered assembly. A well-built layered system using sound isolation clips, hat channel, mineral wool insulation, and two layers of 5/8" drywall with Green Glue damping compound consistently outperforms any single-product fix. Insulation alone will not stop footsteps. Drywall alone will not stop voices. The combination does both.
Here is what a complete DIY assembly includes:
- Sound isolation clips or resilient channel mounted to the joists to decouple the ceiling from the structure above
- Mineral wool (Rockwool) insulation packed into every joist bay to absorb airborne sound
- Two layers of 5/8" drywall with Green Glue damping compound applied between them
- Acoustic/non-hardening elastomeric sealant around every perimeter edge and penetration
Key takeaways
Decoupling the ceiling from the structure above is the single most important step for reducing impact noise in a basement, and no amount of insulation alone will replace it.
| Point | Details |
|---|---|
| Diagnose first | Identify whether noise is airborne (voices, TV) or impact (footsteps) before choosing any materials. |
| Decouple for impact noise | Sound isolation clips and hat channel are the most effective treatment for footstep and structural noise. |
| Add mass and damping for airborne | Two layers of 5/8" drywall with Green Glue between them meaningfully reduces voice and music transmission. |
| Seal every penetration | Gaps around pot lights, plumbing, and ducts undermine even a well-built assembly; acoustic sealant is non-negotiable. |
| LA Rocks Renovations | Serves Durham Region homeowners with full basement ceiling assemblies, from site assessment through fire-rated drywall finishing. |
Table of Contents
- How can you tell if the noise is airborne or impact?
- What materials and tools do you need for the job?
- Step-by-step DIY for an unfinished ceiling with exposed joists
- What are your options when the ceiling is already finished?
- How do you seal pipes, ducts, and other penetrations?
- What improvement and cost should you realistically expect?
- Why does decoupling matter more than insulation alone?
- Should you DIY this or hire a renovation contractor?
- What LA Rocks Renovations has learned from basement ceiling projects
- LA Rocks Renovations handles the full basement ceiling assembly
- Sources
How can you tell if the noise is airborne or impact?
Knowing what you are dealing with before buying a single product saves you money and frustration. Airborne noise and impact noise travel through a building differently, and they respond to different treatments.
Airborne noise includes voices, television, and music. It travels as sound waves through the air, passes through gaps, and vibrates lightweight surfaces. Impact noise is structural: footsteps, dropped objects, chair scraping. It enters the structure directly and radiates downward through the framing.
Try these quick tests:
- TV test: Turn on a television upstairs at normal volume. If you hear it clearly in the basement, airborne noise is a significant problem.
- Footstep test: Have someone walk normally overhead while you listen below. Distinct thuds and rumbles point to impact noise travelling through the joists.
- Tap test: Knock firmly on the ceiling with your knuckles. A hollow, resonant sound suggests little or no insulation in the joist bays.
Typical airborne symptoms include muffled but intelligible voices, bass frequencies from music, and sound that seems to come from everywhere. Impact symptoms are sharper and more directional: you can often pinpoint exactly where someone is walking.
Pro Tip: Check for mechanical flanking paths before you start any ceiling work. Hold your hand near HVAC registers, plumbing stack penetrations, and open grilles. Airflow or vibration at these points means sound is bypassing the ceiling entirely. Sealing these paths is often the highest-return first step.
What materials and tools do you need for the job?
Sourcing the right products before you start prevents mid-project delays. All of the following are available at major Canadian building supply retailers such as Home Depot Canada, Rona, or through acoustic specialty suppliers.
Core materials:
- Sound isolation clips (RSIC-1 or equivalent) and 1-5/8" hat channel — the backbone of a decoupled assembly
- Resilient channel (RC-1 or RC-2) as a lower-cost alternative where budget is tight, though clips outperform channel for impact noise
- 5/8" Type X drywall — fire-rated and required in most Canadian jurisdictions for basement ceiling assemblies adjacent to living spaces
- Green Glue Noiseproofing Compound — a viscoelastic damping compound applied between drywall layers; two tubes cover one standard 4x8 sheet
- Acoustic/non-hardening elastomeric sealant (such as OSI SC-175 or equivalent acoustic caulk) for perimeter sealing and penetrations
- Rockwool Safe’n’Sound or Rockwool Comfortbatt — mineral wool is preferred over fibreglass for its superior sound absorption and fire resistance
- Mass Loaded Vinyl (MLV) at 1 lb/sq ft — useful where headroom is extremely limited; available in rolls from acoustic suppliers
Tools checklist:
- Reciprocating saw and jab saw for penetration work
- Impact driver and appropriate drywall screws (note: screw length matters; see the pro tip in the next section)
- Caulk gun for acoustic sealant and Green Glue
- Utility knife and T-square for drywall cutting
- Safety glasses, N95 respirator, and work gloves (mineral wool fibres are an irritant)
- Stud finder and chalk line for layout
- Scaffolding or a sturdy work platform — overhead work on a ladder is both slow and unsafe
Pro Tip: Buy 10–15% more drywall than your square footage calculation suggests. Staggered seams and waste from cuts add up quickly, and running out mid-job means an extra trip and a delay while Green Glue cures.
Step-by-step DIY for an unfinished ceiling with exposed joists
This is the highest-performance route and the right time to do it properly. If your joists are exposed during a renovation or new build, a correctly installed decoupled assembly gives you the best possible outcome for both airborne and impact noise.
- Measure and plan. Record the existing headroom from floor to joist bottom. A full clip-and-channel assembly with two layers of 5/8" drywall will reduce headroom by a few inches. Mark all mechanical penetrations, wiring runs, and plumbing on a sketch before ordering materials.
- Seal the perimeter first. Run a bead of acoustic elastomeric sealant along the top of the wall plates where they meet the subfloor above. This closes the gap that lets sound travel around the ceiling assembly entirely.
- Fill joist bays with mineral wool. Cut Rockwool Safe’n’Sound batts to fit snugly between joists. Friction-fit is sufficient; no staples needed. Insulation reduces airborne sound meaningfully, but it will not resolve footstep noise on its own — the decoupling step that follows is what handles impact.
- Install joist gasket tape. Apply a thin foam or rubber gasket tape to the underside of each joist before mounting clips. This adds a secondary vibration break between the clip base and the wood.
- Mount sound isolation clips to the joists. Space clips according to the manufacturer’s specification, typically 48" on centre along the joist and 16–24" apart across the run. Do not overtighten the screws; the rubber isolator in each clip must remain free to flex.
- Run hat channel through the clips. Snap 1-5/8" hat channel into the clips perpendicular to the joists. Leave a 1/4" gap at each wall end — the channel must not touch the wall framing or the decoupling is compromised.
- Hang the first layer of 5/8" drywall. Attach drywall to the hat channel using the correct screw length (typically 1-1/4" Type S fine-thread). Stagger seams, keep a 1/4" gap at the perimeter, and never drive screws through the channel into the joist above — that single mistake short-circuits the entire decoupled assembly.
- Apply Green Glue and hang the second layer. Apply two tubes of Green Glue per 4x8 sheet to the back of the second drywall layer in a random serpentine pattern. Hang the second layer with seams offset from the first by at least 16". Work quickly; Green Glue begins to set within minutes.
- Seal the perimeter and all edges. Run acoustic sealant along every joint where the ceiling meets the wall, around electrical boxes, and at any penetration. This step is where many DIY assemblies lose performance — small gaps carry a surprising amount of sound.
- Finish and trim. Tape, mud, and finish the drywall normally. Install trim or baseboard at the ceiling-wall junction over the sealant bead.
Safety notes: In Canada, basement ceiling assemblies that separate a living space from a garage or mechanical room typically require a fire-rated assembly under the National Building Code. Type X 5/8" drywall satisfies this in most cases, but confirm with your local building department before starting. Recessed pot lights are a significant fire and sound barrier issue — use airtight, IC-rated fixtures or relocate them to a wall. Consult a licensed electrician before modifying any electrical boxes in the ceiling.
Pro Tip: Never let a screw touch both the hat channel and the joist above it. Even one bridging fastener creates a rigid connection that transmits impact noise directly, defeating the clips entirely. Check every screw after installation.
A decoupled ceiling assembly, when installed correctly, can deliver a meaningful improvement in both airborne and impact noise performance. The key word is “correctly” — the details of fastener placement, perimeter sealing, and gap management determine whether the assembly performs as intended or falls well short.
What are your options when the ceiling is already finished?
A finished ceiling does not mean you are stuck. Three practical retrofit paths exist, each with different trade-offs on cost, disruption, and performance.
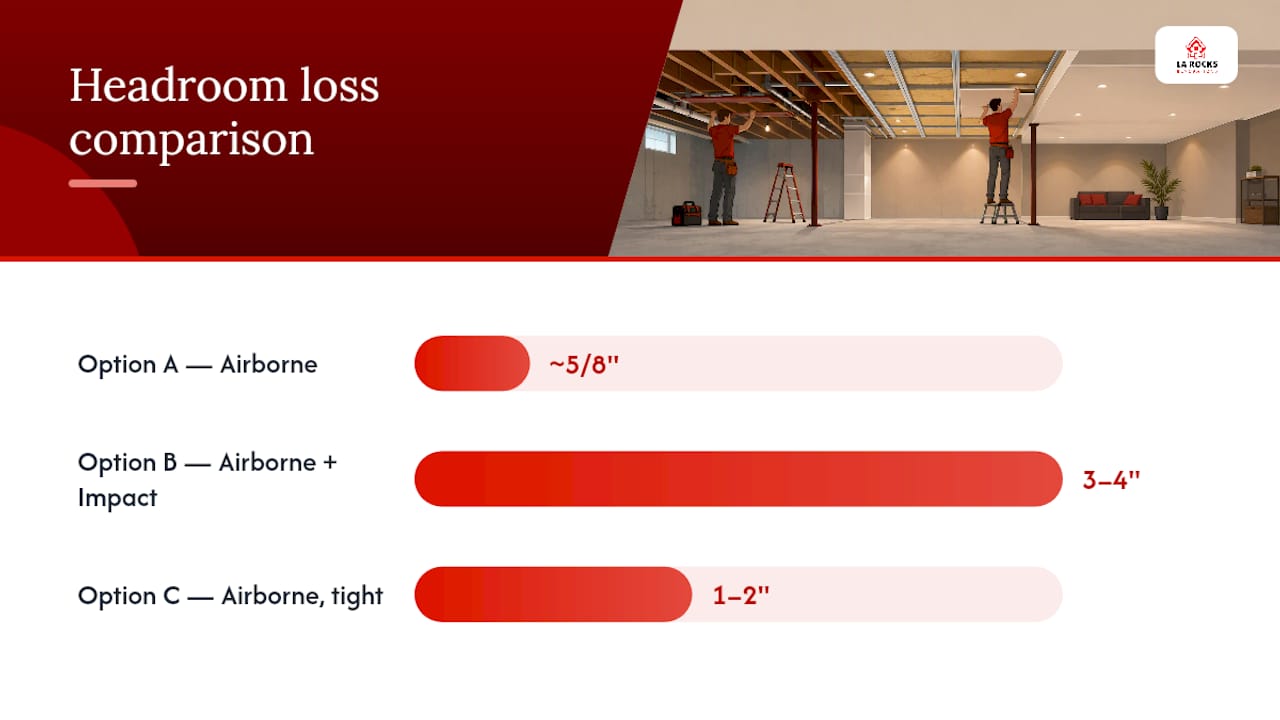
Option A: Add a second drywall layer with Green Glue
Screw a new layer of 5/8" drywall directly over the existing ceiling with Green Glue applied between the layers. This retrofit improves airborne noise performance noticeably and requires no demolition. The limitation is that it does nothing to decouple the assembly from the structure, so footstep noise will improve only modestly. Headroom loss is about 5/8".
One caution: if the existing ceiling has an air gap between it and the joists above, adding a new rigid layer can create a triple-leaf resonance. This is a known DIY pitfall where a sealed cavity between two rigid layers amplifies certain low frequencies rather than damping them. If you suspect a gap, probe a small area before committing to the full layer.
Option B: Furr down with a new decoupled layer
Remove the existing drywall (or leave it and accept the triple-leaf risk), install isolation clips and hat channel on the joists, and hang a new double-drywall assembly below. This is more invasive and costs more, but it addresses both airborne and impact noise. Headroom loss is typically 3–4 inches total.
Option C: MLV or suspended acoustic drop ceiling
Mass Loaded Vinyl stapled or draped across the existing ceiling adds mass without demolition and can be covered with a drop-tile grid. This is the right choice when headroom is extremely limited and the primary concern is airborne noise. MLV does not replace decoupling for footstep noise, but it is a practical improvement for a finished space with minimal disruption.
| Best for | DIY difficulty | Headroom loss | Expected improvement |
|---|---|---|---|
| Airborne noise (Option A) | Low | ~5/8" | Moderate airborne gain; minimal impact gain |
| Airborne + impact (Option B) | High | 3–4" | Strong airborne and impact improvement |
| Airborne, tight headroom (Option C) | Low to medium | 1–2" | Moderate airborne; limited impact gain |
How do you seal pipes, ducts, and other penetrations?
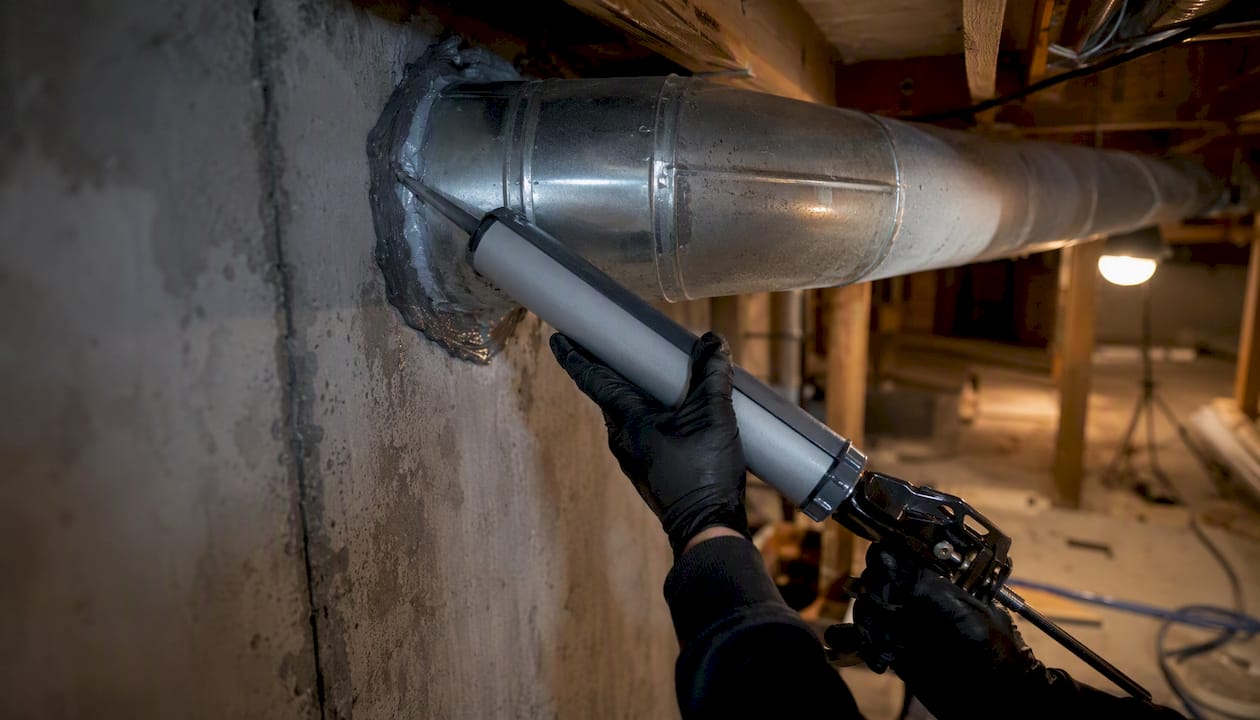
A ceiling assembly is only as good as its weakest gap. HVAC ducts, plumbing stacks, and open return grilles are among the most common flanking paths that allow sound to bypass an otherwise well-built ceiling.
Common penetrations to address:
- Plumbing stacks and drain pipes: Wrap exposed pipe runs with MLV and seal the gap where the pipe passes through the ceiling with non-hardening acoustic sealant or a putty pad. Never use rigid foam or hard caulk here — the pipe needs to move slightly with temperature changes.
- HVAC supply and return ducts: Line short duct runs with acoustic duct liner or wrap them with MLV. Flexible duct connectors at the plenum reduce vibration transmission. Do not restrict airflow or block return grilles — consult an HVAC technician if you are unsure.
- Recessed light fixtures: Replace standard pot lights with airtight, IC-rated fixtures. Seal the gap around the housing with acoustic sealant. A single unsealed pot light can undermine the entire ceiling assembly.
- Electrical boxes: Use putty pads (pre-formed acoustic putty) around outlet and switch boxes in the ceiling. These compress to fill the cavity behind the box and block the air path.
- Open grilles and vents: Install acoustic baffles or lined duct elbows behind grilles where sound transmission is a problem. A bare return grille is essentially an open window for sound.
Airtightness is consistently the weakest link in DIY assemblies. Even a small gap around a pipe or fixture carries a disproportionate amount of sound — the acoustic equivalent of a crack under a door.
Safety note: Never seal or restrict HVAC airflow without consulting a licensed HVAC technician. Blocking return air can damage equipment and create carbon monoxide risks in homes with gas appliances.
What improvement and cost should you realistically expect?
Setting honest expectations before you start prevents disappointment and helps you decide how much to invest.
Performance guidance (qualitative):
- Decoupling (clips + hat channel) delivers the largest improvement for impact noise. It is the single most important step if footsteps are the primary complaint.
- Added mass (extra drywall layer) improves airborne noise. Multiple layers of drywall with a damping compound between them significantly improve sound reduction for voices and music compared to a single layer.
- Insulation alone helps with mid-to-high-frequency airborne sound but does little for low-frequency bass or any impact noise.
- Sealing gaps often produces the most noticeable improvement per dollar spent, particularly in older homes where penetrations are numerous.
Typical material cost ranges in Canada (small-to-medium basement, roughly 600–800 sq ft of ceiling):
- Seal-only approach (acoustic caulk, putty pads): $100–$300 in materials
- Add insulation to empty joist bays: $400–$800 in materials
- Single drywall layer with Green Glue over existing ceiling: $800–$1,500 in materials
- Full clip/channel + double-drywall assembly (materials only): $2,000–$4,000+
Contractor labour in Durham Region and the broader GTA typically adds $3,000–$7,000 for a full decoupled assembly, depending on ceiling complexity, access, and finishing requirements. These are general ranges; get a written quote for your specific project.
Timeline bullets:
- Seal + single drywall add-on: one to two days for a typical basement ceiling
- Full clip/channel and double-drywall install: three to five days, plus 24–48 hours for Green Glue to cure before taping
- Prep, drying, and finishing add another one to two days
A note on treating the source upstairs: Adding carpet and a quality underpad upstairs often reduces impact noise in the basement as much as a moderate ceiling upgrade, at a fraction of the cost. If headroom is limited or budget is tight, this is worth doing first. LA Rocks Renovations also offers flooring installation for homeowners who want to address the source at the same time as the ceiling.
Why does decoupling matter more than insulation alone?
This is the point most homeowners miss, and it is the reason many DIY soundproofing projects disappoint.
Impact noise, the kind generated by footsteps and dropped objects, enters the building structure directly. It does not travel through the air first. Insulation in the joist bays cannot intercept it because the vibration is already in the wood before the sound wave reaches the air cavity. Packing more insulation into a hard-mounted ceiling adds mass but does not break the structural connection.
Decoupling with sound isolation clips and hat channel works by floating the ceiling on rubber-isolated mounts. The vibration from the joist above has to pass through the rubber isolator before it can reach the drywall below. That rubber break is where the energy is lost. The result is a ceiling that moves independently from the structure, which is the only reliable way to reduce impact noise.
The most common reason a soundproofed ceiling underperforms is not the wrong product — it is a rigid connection left somewhere in the assembly. One screw touching both the hat channel and the joist, one channel end pressed against the wall, one clip with a stripped isolator: any of these bridges the decoupling and lets impact noise travel straight through.
Airtightness compounds the problem. A well-decoupled ceiling with a single unsealed gap around a pot light or plumbing stack loses a significant portion of its airborne performance. The two issues are separate but equally important: decoupling handles structural vibration, sealing handles airborne transmission.
Pro Tip: After installation, have someone walk heavily overhead while you listen from below with the lights off. You will hear any remaining rigid connections as distinct, localized thumps rather than the diffuse, muffled sound of a well-decoupled ceiling. Mark those spots and check the fasteners.
Where headroom is severely limited, a single layer of 5/8" drywall on isolation clips often outperforms a double-layer hard-mounted ceiling for impact noise. The decoupling matters more than the added mass in that scenario.
Should you DIY this or hire a renovation contractor?
The honest answer depends on your specific situation. Here is a practical checklist to help you decide.
DIY is reasonable if:
- The joists are exposed and accessible
- You are comfortable working overhead for extended periods with proper scaffolding
- You have experience with drywall installation and finishing
- No electrical modifications are needed (no recessed lights to relocate)
- The project does not require a building permit in your municipality, or you are prepared to pull one yourself
- You have access to the tools listed in the materials section
Consider hiring a contractor when:
- The existing ceiling is finished and needs to be partially or fully removed
- Recessed lighting needs to be relocated or replaced with airtight fixtures
- The project requires a fire-rated assembly (garage ceiling, mechanical room) under the National Building Code
- Headroom is tight and every inch matters — a contractor will measure and plan more precisely
- You want a warranty on the work and a finished result that looks professional
What a qualified contractor provides:
- Accurate headroom and layout planning before ordering materials
- Code-compliant fire-rated assemblies with the correct drywall specification
- Proper clip spacing and fastener discipline that preserves decoupling
- Clean drywall finishing, tape, mud, and paint-ready surfaces
- Access panels where required for plumbing or electrical maintenance
Questions to ask any contractor before signing:
- What STC/IIC improvement are you targeting, and how will you achieve it?
- Which clip system are you using, and what is the spacing?
- Is the drywall Type X 5/8" fire-rated?
- How do you handle penetrations (pot lights, plumbing, ducts)?
- What does the warranty cover, and for how long?
- Will you pull the required permits?
For homeowners weighing the DIY vs professional path, the challenges of a DIY installation apply broadly to any overhead finish work: the margin for error is low, and mistakes in a ceiling assembly are expensive to correct after the fact.
What LA Rocks Renovations has learned from basement ceiling projects
The most common mistake is relying on insulation alone. Homeowners pack Rockwool into every joist bay, hang a single layer of drywall, and wonder why the footsteps are still clearly audible. The insulation did its job — it absorbed some airborne sound — but nothing broke the structural connection. The ceiling is still rigidly attached to the joists, and every footstep above travels straight through.
The second most common mistake is sealing oversights. A careful installer will spend time on clips and drywall and then leave a 1/2" gap around a plumbing stack unsealed. That gap undoes a meaningful portion of the airborne performance.
The third mistake is the triple-leaf problem. Adding a new drywall layer over an existing ceiling with a trapped air cavity between them can actually amplify certain low frequencies. If you are retrofitting over an existing ceiling, either remove the old layer or fill the cavity completely with insulation before adding the new layer.
When LA Rocks Renovations quotes a soundproof ceiling, the conversation always starts with headroom. A homeowner who wants maximum performance but has 7’6" of floor-to-joist clearance has different options than one with 8’6". The team works through the trade-off between clip/channel depth, drywall layers, and finished headroom before recommending an assembly. Performance is the goal, but a basement that feels cramped after the work is done is not a success.
For a practical example of how sequencing and ceiling work come together in a real project, the basement ceiling restoration completed in Newtonville shows how the finishing phase follows the structural work.
LA Rocks Renovations handles the full basement ceiling assembly
Soundproofing a basement ceiling properly takes more than a weekend and a tube of caulk. For homeowners in Durham Region who want the job done right the first time, LA Rocks Renovations handles the complete assembly: framing assessment, insulation, clip and hat channel installation, fire-rated drywall, Green Glue application, finishing, and post-install inspection.
The team serves Bowmanville, Clarington, Oshawa, Whitby, Ajax, Pickering, and communities across Durham Region. Every project starts with a site visit to measure headroom, identify penetrations, and confirm the right assembly for your specific ceiling. Services include professional drywall installation and finishing for homeowners who need a clean, paint-ready result after the acoustic work is complete.
To get a written quote for your basement ceiling, visit the basement renovations page and request a site assessment. LA Rocks Renovations will confirm the right clip system, drywall specification, and fire-rating requirements for your project before any work begins.
Sources
The following resources informed this guide and are worth consulting for additional technical detail and product specifications. Product availability and building code requirements can vary across Canadian provinces and municipalities, so confirm current specifications with your local supplier or building department.
- How to soundproof a basement ceiling | Family Handyman
- How to soundproof a basement ceiling | Second Skin Audio
- How to soundproof a basement ceiling | Trademark Soundproofing
- Basementremodeling
- Basement soundproofing materials and methods | Acoustical Solutions
- How to soundproof a basement ceiling properly | ESG Builders
- How to soundproof a basement ceiling | Better Soundproofing